
There’s a million “how to start a blog with WordPress” guides on the interwebs, I’m honoured you chose mine. To ensure everything goes smoothly for you, I’ve included some key background information many bloggers leave off the table.
At almost 8,000 words, you might want to put your phone on vibrate and make a cup of tea.
Table of Contents

Learning How to Start a Blog and Make Money Has Been an Epic Journey
Learning how to start a blog with WordPress has had an incredible impact on our lives. After rebooting Hobo with a Laptop and giving it a clear purpose in May 2017, my wife and I started to make money blogging within 3 – 4 months.
It started as a trickle, and before we knew it we were floating for weeks at a time on passive income generated by affiliate marketing. We were hooked, and we’ve been growing our passive income month after month, ever since.
I’d known how to setup blog sites with WordPress for years, but for the most part I was offering my skills as a service for others; only when I started to apply what I learned as an internet marketer for myself did I begin to own the potential to make money blogging.
Beyond that, Hobo with a Laptop –even when it was little more than a passion project, started to produce more business leads than our main business blog, Copyrise.
Related: The Top Blogging Tools We Use For THIS Blog

People dug the story.
They liked the honesty of it all; guy leaves everything behind in 2013 to become a digital nomad, hires a virtual assistant, meets up with her a few years later, they start a blog, get married, and then the adventure really begins.
It’s not exactly something I’d put on a business blog. I never thought clients would be okay with the fact that on paper I’m homeless.
Well, it wasn’t something I’d put on a business blog.
Until it was –and our blog became our business. And that wouldn’t have happened if I didn’t start a blog with WordPress, put myself out there, and share our experience.
After 14 months, Hobo with a Laptop has become our main income source, netting around $6k per month in affiliate sales, sponsored posts, free accommodation, and client projects –on it’s own, that’s not including our other websites.

Whether you want to work from home, become a digital nomad, get a better job, or start a business; learning how to start a blog with WordPress is going to give you an edge, no matter what you do.
I’d probably have written this post sooner, but I was skeptical; I didn’t want to be a poser. I kept waiting for the other shoe to drop.
It must be stuck up there somewhere, because it never did.
The hard part is to figure out what to blog about. After that, everything sort of falls into place.
Don’t get me wrong, starting a blog and making money is a lot of work.
It’s not all palm trees, laptops beside the beach, selfies and bullsh*t. It requires a lot of focus and motivation for the first year. You might not see your friends for awhile.
But the payoff of making money with a blog is that it’s an asset that increases in value over time –one that you can pull money out of like an ATM when you need it.

If you’re willing to live how no one wants to for a year, you’ve got the potential to live how everyone wishes they could, later on.
How to Start Blogging –a Guide for Absolute Beginners
After producing countless WordPress blogs over the years, we’ve streamlined the process of blogging for beginners.
We put our heads together to make sure that we didn’t leave out any important details so your experience will be as painless as it can be.
Welcome to our free, no filler How to Start Blogging with WordPress guide.
We’re really glad you’re here, sharing the adventure with you makes it so much more valuable.

Before You Start a Blog with WordPress
Before you learn how to start a blog and make money with it, there’s some really important groundwork you may want to consider beforehand –especially if this is your first rodeo.
What you do before setting up a blog site will be the difference between success and failure.
Qualify Your Unique Blog Idea, First
This article has some professional-grade tips on blogging for beginners –qualify your idea with readily available data on sites like Amazon or Google to ensure there’s a demand, learn how to leverage that demand, and future-proof your blog so you don’t burn out or get tired of the subject matter in your first year.
Simply put, doing a little research before you start blogging will allow you to “try on” your blog topic and give you a clear idea of what’s to come.
How to Start a Blog with WordPress

Part 1: What You Need
Starting a blog with WordPress requires the following ingredients:
- Your website address, also known as a domain name
- Fast WordPress hosting, sort of like the land you build your house on
- Premium WordPress theme, the wallpaper, curtains, and furniture
- Google Analytics, the notary that assigns a value on your website
And of course you’ll need WordPress software, the ‘home’, but that’s free and can be setup in two clicks after you buy hosting. I’ll show you how to do it when we get there.
You Get What You Pay For
If you want to get the most bang for your buck along with capable and fast support in emergencies, I suggest the following companies to provide the services you need to start a blog with WordPress.
For the best price on any blog-related service, pay annually, and it’s probably a safe bet that you make your purchases after skimming this entire article.
After a quick skim, circle back and put all these pieces together in real-time, as you follow along.
Here are some accounts you will create during this tutorial:
- Buy your domain name from GoDaddy for $11.99; they’re the best deal around, offer privacy (so no one sees your name and address on the public record of your website registration if you choose), and they’ve got quick-responding, 24hr support
- Buy your WordPress hosting from SiteGround for as low as $47; I’ve hosted with some companies that gave me a terrible experience –HostGator, HostDime, and Bluehost have all left me in a pickle at one time or another and I’ll explain that a little more in a moment
- Buy your premium WordPress theme from ThemeForest after you read this buyer’s guide –you can buy your theme later on, you don’t need to buy one right this minute
- Create a Google Analytics account and setup Monster Insights and Yoast SEO to help with search engine optimization
I’m going to explain the choices above in a little more detail below, and then put it all down in an easy to follow point-form How to Start Blogging with WordPress step-by-step tutorial.
If you trust me on these choices and want to skip the explanations below, click here and I’ll walk you through the purchase process for your domain name and hosting and then I’ll show you how to set them up.

Choose WordPress Hosting Wisely –or Else
If you register your domain name with the same company you host your WordPress website with, and then decide to switch hosts, it’s just another hook you have to remove during an already painful process. It’s sort of like the hassle involved in porting your cell phone number from one phone company to another.
Registering your domain with a standalone account makes it easier to switch hosts down the line if you ever wanted to.
While combining your hosting and domain registration is more convenient during the sign up process when starting a blog with WordPress, it could bite you later.
GoDaddy does offer hosting although in my experience it hadn’t loaded a few client websites the fastest, and I found their options under the hood a little too branded and basic for hosting. They’ll try to up-sell you on this when you buy your domain name, but hosting just isn’t their strong suit in my opinion.
As for HostGator, oh man. Too many restrictions for blogging for beginners and you don’t discover that until it’s too late, nor are they easy to deal with if you’re just figuring out how to start blogging. They provide the bare minimum everything and in my experience, the support is terrible.
My experience with HostGator pretty much sums up my experience with every WordPress host I’ve had before SiteGround –but for this one, I took screen shots.
A WordPress host is a computer, WordPress itself is software. Too few resources like memory, CPU speed, or bandwidth –and that software loads slowly, or it won’t run at all.
While assisting a brand new travel blogger learn how to start blogging, the simple task of uploading images kept resulting in a fatal error. So I contacted HostGator support and during our hour+ chat, they broke the site twice (it wouldn’t load whatsoever after they made changes) and in the end, they blamed the theme and didn’t resolve the issue.
The theme in question? The one I’m using now. Yup, you’re lookin’ at it. For whatever reason, the technical support representative didn’t know how to allocate more memory to my friend’s WordPress installation or increase the size of uploads to the server. That’s a big hassle for someone who is still learning how to start blogging.
They’ve also got some mandatory plugins that are really low quality, buggering up the use of higher quality alternatives.
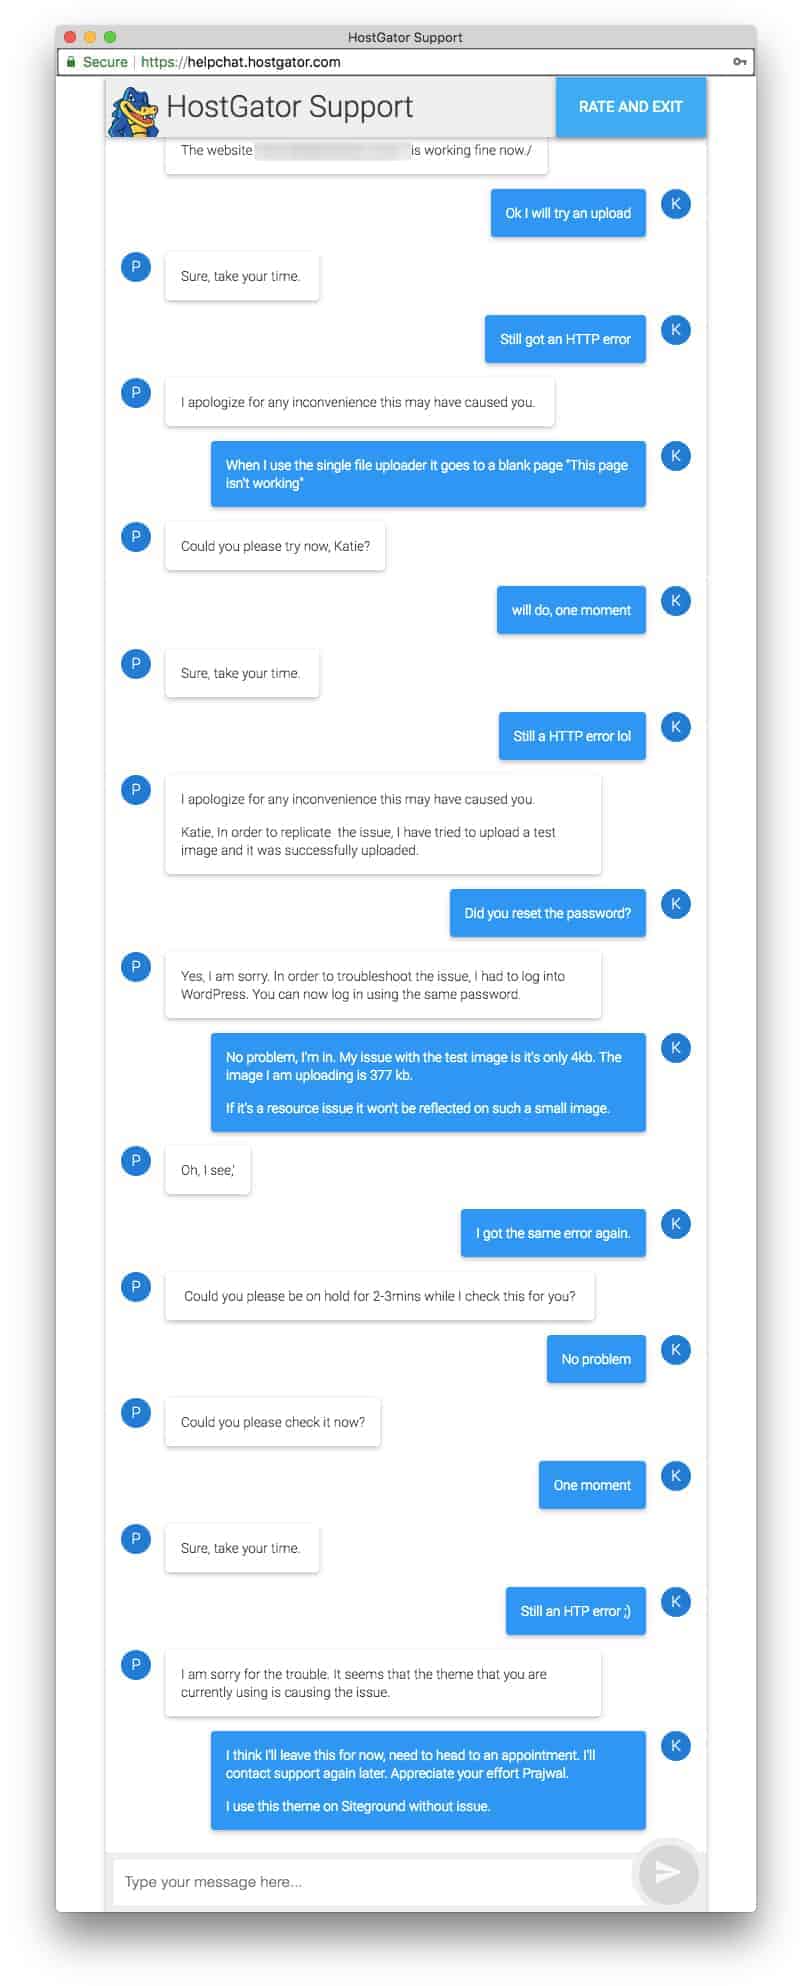
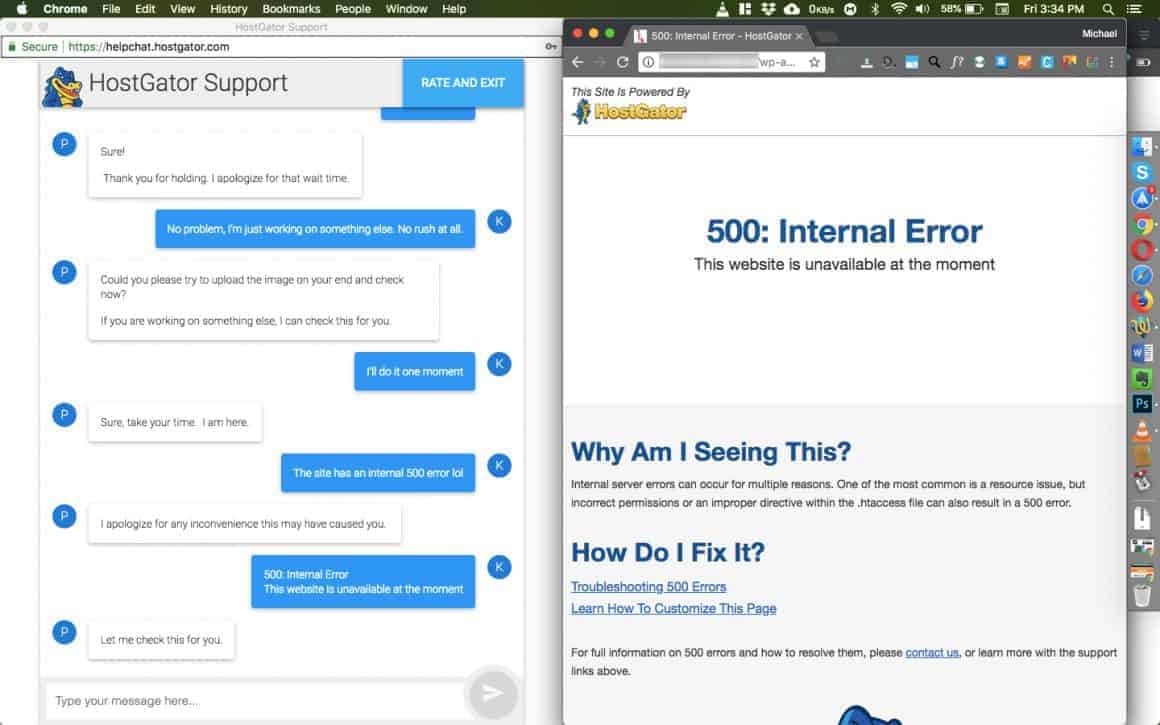
After that, it took 20 minutes to sign up for SiteGround, who then moved the website from HostGator to SiteGround, free of charge.
Other benefits of SiteGround include a free SSL certificate, knowledgeable and fast 24hr support, and more resources allocated to your website so it doesn’t f*ck up when you upload an eenie weenie 377 kb image.
Moral of the story: Don’t shop for a WordPress hosting provider based on price alone. SiteGround is the best value for your money.
A Free SSL Certificate, You Say?
![]()
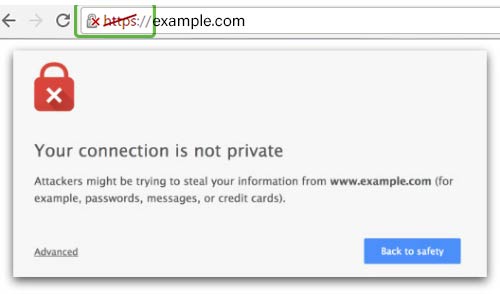
You see that little green lock to the left of our website address above? That means our site is as secure as a bank’s website. It sounds like overkill, but Google made it an important website ranking factor so everyone followed suit.
Recently, Google started shaming websites for not being secure by way of a warning as if you were visiting a villainous monster’s lair. It scares people away and makes it harder to start a blog and get paid without an SSL certificate.
The warning looks like this:
An SSL certificate normally costs money. If you start blogging with SiteGround, you get an SSL certificate by Let’s Encrypt for free, for life. This makes SiteGround an ideal hosting provider for blogging for beginners and professionals alike.
Here’s what an SSL certificate would normally cost, from Comodo:
Premium Themes for WordPress
When you first start setting up a blog site with WordPress, it comes with a default theme Called Twenty Seventeen that’s not too shabby; it’s probably got everything you need in a WordPress theme –the only problem with it is it’s lack of originality because so many blogs use it.

To set yourself apart, you’re going to want to pick up a premium WordPress theme. However, you absolutely must not rush it.
Here’s a few pointers for choosing a WordPress theme when setting up your blog site;
- Free themes are usually out of date, unsupported, and full of security vulnerabilities which can allow a bot or malicious hacker to infuse code in them that can break your site, mine for cryptocurrency, or harm the computers of all who visit your blog
- Most themes are generally specialized for a specific function like ecommerce, a photography portfolio, magazine, services-based business, etc. Just because a theme looks great on someone else’s blog, it may not look good on yours; WordPress themes are like Speedos, they only look good if you have enough content to fill them out
- Support varies from one theme design company to another, so it’s important to ensure your theme will be supported for at least six months after purchase –even skilled bloggers require a little of help sometimes, and there may be code imperfections that are hidden within your premium theme
- What a WordPress theme looks like is only half the battle –how easy it is to configure varies from one theme to another –and you often can’t see what that looks like until after you make a (typically non-refundable) purchase
- Read theme reviews and comments and keep an eye out for any common complaints as well as how the developer handles them; do they respond quickly or have a proper support platform where you can create a ticket? Do people seem happy? How often is the theme updated?
Learning how to start a blog with WordPress is one thing, choosing a theme that fits your unique needs is entirely another.
To help you out, I wrote a Premium WordPress Theme Buyer’s Guide that will help you define your functional requirements and pick the right theme for your blog.
You can set up your blog site today, and then pick up a theme in a few days after you’ve had some time to explore your options.
How to Start Blogging with WordPress

Part 2: WordPress Step-by-Step
In this section of our How to Start a Blog with WordPress how-to guide, we’ll break the entire process down for you, step by step.
In some cases we use affiliate links which means we get a wee kickback from the company. Using our referral links will never increase the cost of your purchase; it’s just a friendly way to show appreciation for helping you learn how to start a blog with WordPress.
Blogging for Beginners
In this section we’ll cover:
- How to buy a domain from Godaddy
- How to buy WordPress hosting from SiteGround
- How to connect your domain to your hosting
- How to install WordPress on your host server
- How to setup your blog site’s email address
- How to upload and configure your premium WordPress theme
- How to setup Google Analytics and avoid a common SEO problem
When we get around to uploading and configuring your WordPress theme before you start blogging, please bare in mind that each theme will have its own unique way it handles customization.
We’ll help you start setting up your blog site with a premium WordPress theme, and from there we suggest you review your theme’s documentation to fill in any gaps of understanding.

How to Buy a Domain From GoDaddy
Before you learn how to create a blog on WordPress, you’ll need a domain. If you want to save a few bucks on your domain registration when you start your blog with WordPress, we suggest GoDaddy. You can buy a domain from GoDaddy and host it on any WordPress host.
Don’t have a credit card?
If you don’t have a credit card, you can pay for your domain name with PayPal. The only catch I’ve noticed is that promo codes usually don’t work when you use PayPal. If for any reason their website won’t let you pay with PayPal, call their customer support. I’ve used PayPal before, so you probably can, too.
1
Go to https://godaddy.com and type in the domain name you’d like to purchase. Most people choose “.com” for their domain extension, and if you don’t, we suggest you pick it up anyway.

In fact, pick out a few domains with the same root domain name (ie. hobowithalaptop.com, hobowithalaptop.org, hobowithalaptop.ca, etc.) to future-proof yourself from copycats and confusion over your brand identity down the line. Celebrities like Taylor Swift do this, but so do everyday bloggers like us.
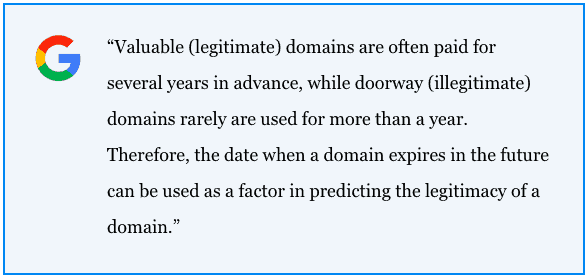
Worth note is that Google also gives a little extra “Google Juice” to blogs that register for more than a year.
If you’ve qualified your blog idea and you’re confident you’ll be around awhile, registering your domain name for longer than a year even when you’re still learning how to start a blog with WordPress, will demonstrate to search engines that you’re in it for the long haul and you’re worth indexing a little faster.
Domain registration length is a ranking factor with Google, so you’ll likely benefit by ranking better than those who only register for a year when they start blogging.
2
GoDaddy is the king of the up-sell, so double check your options before you head to the final screen of the domain purchase process. All you need is your domain(s), full stop.
Domain Privacy?
If you’re starting a WordPress blog where you’re not comfortable registering it with your real name, you may want to consider purchasing “privacy”.
Adding privacy puts the name and address of an intermediary on the public record of your domain registration, not your own. If you’re from the UK, privacy may be included due to new GDRP regulations.

Personally, I don’t believe we added privacy for our hobowithalaptop.com registration. If you don’t want privacy, change this pre-selected up-sell to “no thanks”.
Email?
The role of facilitating email addresses for your domain falls on your host, not your domain registrar. So there’ no need to purchase email from GoDaddy –can’t blame them for tryin’ though!
I’ll show you how to configure your blog’s email address with SiteGround later on.
3
Finalize your purchase, and you’re done! Be sure to double check whether GoDaddy snuck anything in that you don’t want, and the length of your domain registration is set to the amount of time you think is best.

How to Buy WordPress Hosting from SiteGround
After choosing a domain that suits your brand identity, the next big important step on this how to start blogging with WordPress how-to guide is choosing the right hosting package from SiteGround.
Don’t have a credit card?
If you don’t have a credit card, you can pay for SiteGround with PayPal. Simply contact support using their livechat feature and they’ll manually create your account for you. It’s the same as the process below, except they do the following steps on your behalf.
1
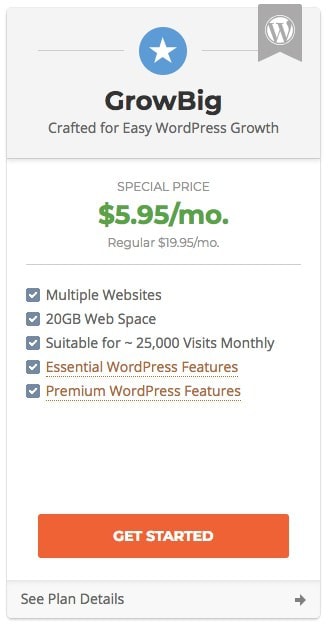
Go to https://siteground.com and choose the hosting package that best suits your needs. SiteGround has 3 different hosting packages for people who start a blog with WordPress.
All options come with automatic WordPress software updates, daily backups of your website, and they keep each backup for 30 days.
Backups are easy to restore on your own at the click of a button, and GrowBig and GoGeek hosting packages include the option to have their technical support team do it for you if you’re ever freaking out and need a second set of eyes on it (guilty!).
Choose your destiny:
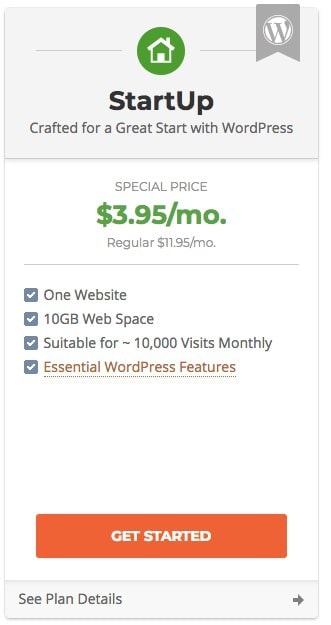
Which Hosting Package is Best for Starting a Blog with WordPress?
“StartUp” limits you to only having a single WordPress website, comes with 10GB storage, and doesn’t come with free backup restoration, top-priority support, the fastest site caching, or a free site transfer if you’re coming from another host like HostGator.
It’s still a great hosting plan if your needs are on the lighter end of the spectrum.
I suggest the “StartUp” option only for those taking their blog a little less seriously, although these things have the potential to become something amazing –something we weren’t planning for, like Hobo with a Laptop did. So choose this hosting package at your own risk. Upgrading later comes at full price.
“GrowBig” is the hosting package we’re currently on, and about to outgrow –no pun intended. You can run as many sites as you like with this one, however you’re limited to 20GB and ~25,000 website visits per month. This is more than enough for WordPress hosting for beginners.
It also comes with top-priority support, faster site caching, free site transfer, and free backup restore. “GrowBig” is the option I suggest all WordPress beginners start with because it covers all your bases and provides a little peace of mind should anything go wrong. Better support, and room to grow.
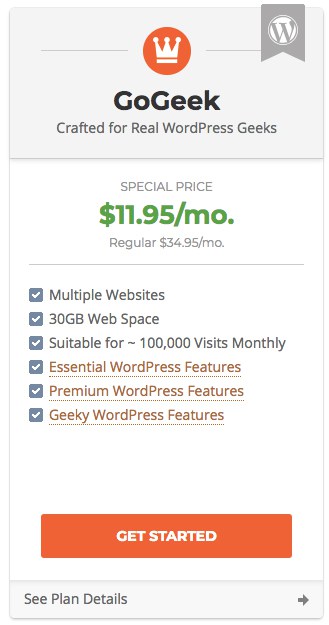
“GoGeek” comes with every option I’ve already mentioned and 30GB of space for as many websites as will fit, and ~100,000 visits per month.
2
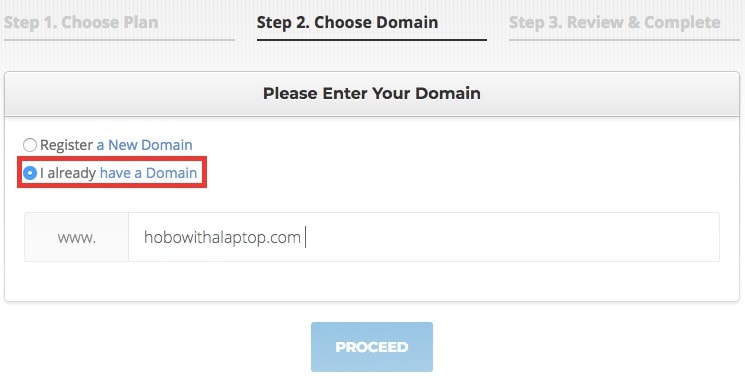
Choose the hosting package that’s right for you by clicking “get started”. On the second step, select “I already have a domain” and enter it in the box below. After that, click “proceed”.
3
Next, fill out your payment details and then scroll down the page –there’s a (good) catch I want you to know about. When you first sign up to SiteGround, they give you a mega discount. And that discount is for as long as you register your site for right now.
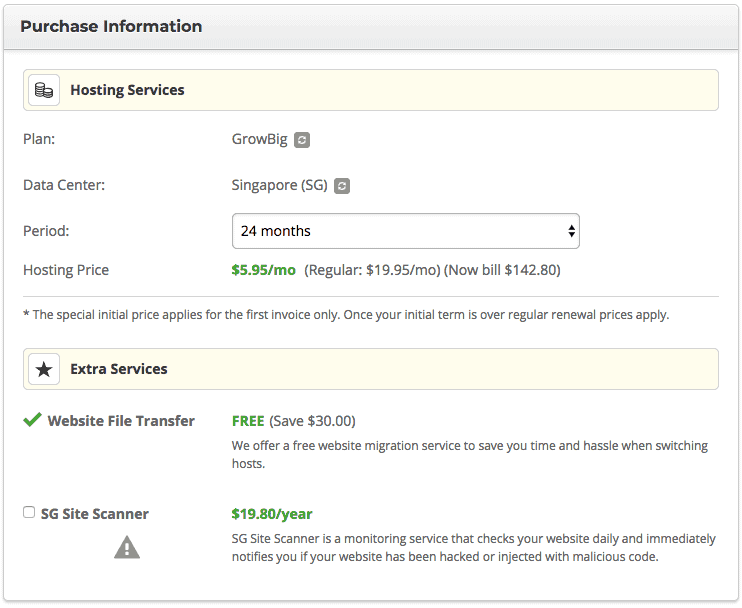
That discounted price isn’t only for the first year –it’s for the amount of time you choose when you first sign up. If you sign up for 24-36 months and pay up front, you’ll save a couple hundos, right off the top.
We didn’t do this, and I wish we had. And if you signed up for “GrowBig”, you can host multiple websites under the account –even if you drop the blog idea you’ve got right now for another one in the future, this account will be locked in for as many months as you choose at the discounted rate.
It’s just some food for thought, but today is the day you need to make that choice. On the flip side, if you start making money blogging within your first year the hosting will pay for itself anyway.
4
After that, you’ll get an email confirmation for your new account. Click the link within the email and head back to SiteGround. When logged in, you’ll be presented with a step-by-step ‘wizard’ process to set up your first website.
Since you’ve already told them what domain you’re using, now is the time to head back to GoDaddy and tell them where to point your domain.
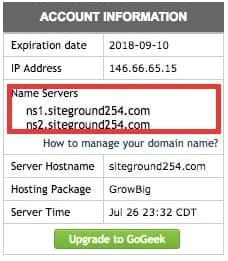
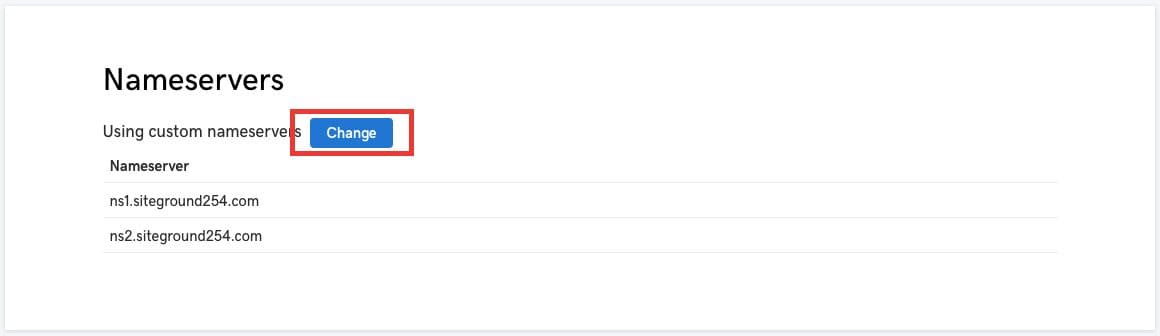
But first, you’ll need to figure out what your domain Name Server address (DNS) is on SiteGround. It’s not the same as your domain name.
Cancel or skip any wizard that’s in front of you on SiteGround and head to your CPanel. To access your CPanel, click on My Accounts, and then click “Go to CPanel”.

Once in CPanel, there’s an Account Information pane on the upper left and it’s got your Name Servers. Yours may differ from mine, so be sure to check the Name Server information in your own account.
Now keep that browser tab open and head back to GoDaddy. The rest of your instructions are in the next section of this how to start a blog with WordPress how-to guide.

How to Connect Your Domain Name to Your WordPress Hosting
If you don’t link your domain name to your WordPress hosting when you start your blog, you won’t be able to access it. Even if you install WordPress, internet browsers wouldn’t be directed by GoDaddy to your blog until you link the two together.
In this section we’ll show you how to link your domain name from GoDaddy to your hosting account on SiteGround. After that, we’ll show you how to install WordPress and set up your blog site.
1
Log into GoDaddy and click on My Products if it doesn’t take you there as soon as you log in. Once you there, you should see a list of your domain(s) with options on the right side. Click on “DNS”.

After you click on DNS, hit the “Change” button. Now go back to SiteGround and copy/paste your Name Server addresses, both of them, into the Name Server fields on GoDaddy. After that, hit save.
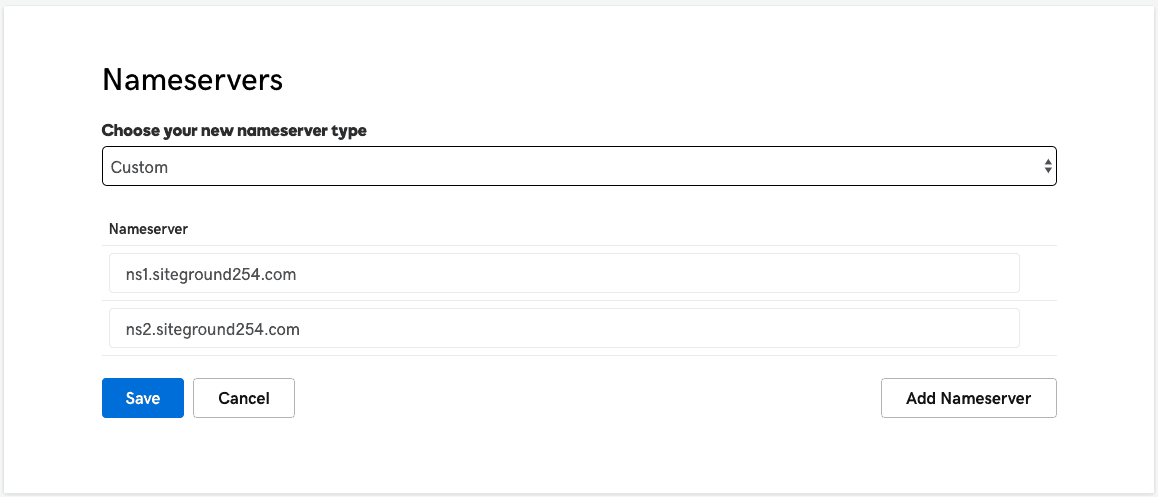
You’re done! Now it’s time to make a coffee or go have lunch.
Name Server Propagation Times
It can take a few hours for your Name Server settings to propagate around the globe. In simple terms, this means is that when you change your Name Servers, all the internet hubs around the world through undersea cables –the backbone of the internet– need to “get the memo” that you changed where your domain is pointing.
If you’re in America, this process will likely take a few minutes. If you’re in Asia, it could take longer. It’s a lot of memos.
I’ve noticed that it takes longer in Asia, maybe up to an hour or so, and when I use my VPN and try to continue the next steps from a US location, the site has propagated quicker.
Changing your Name Server is really the only time you have to wait on the internet to catch up. In the future when you update your blog or add a new post, it will happen instantly.
Nonetheless, that’s all a bunch of technical mumbo jumbo. Take a break and return to this how to start a blog with WordPress tutorial in an hour, just to be on the safe side.

How to Install WordPress
High five on making it this far! We hope you had a groovy break and it didn’t take very long for your Name Server changes to propagate.
In this section of our how to start blogging with WordPress step-by-step guide, we’re going to install WordPress on your host.
1
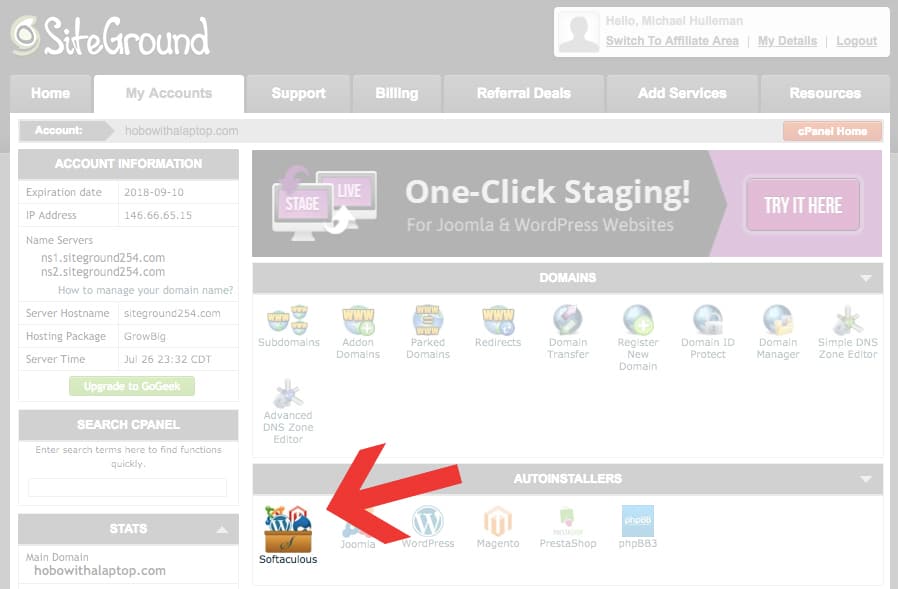
To begin, head back to SiteGround, log-in, click My Accounts, and then click on Go to CPanel like you did before. Once you’re there, look for “Softaculous”. That’s the WordPress installer.
2
Now hover over WordPress to reveal the WordPress blog “install” button. After that, fill in your settings. Don’t enable multi-site, don’t install a free theme, do enable HTTPS, and write down your login information. Then hit “Install”.
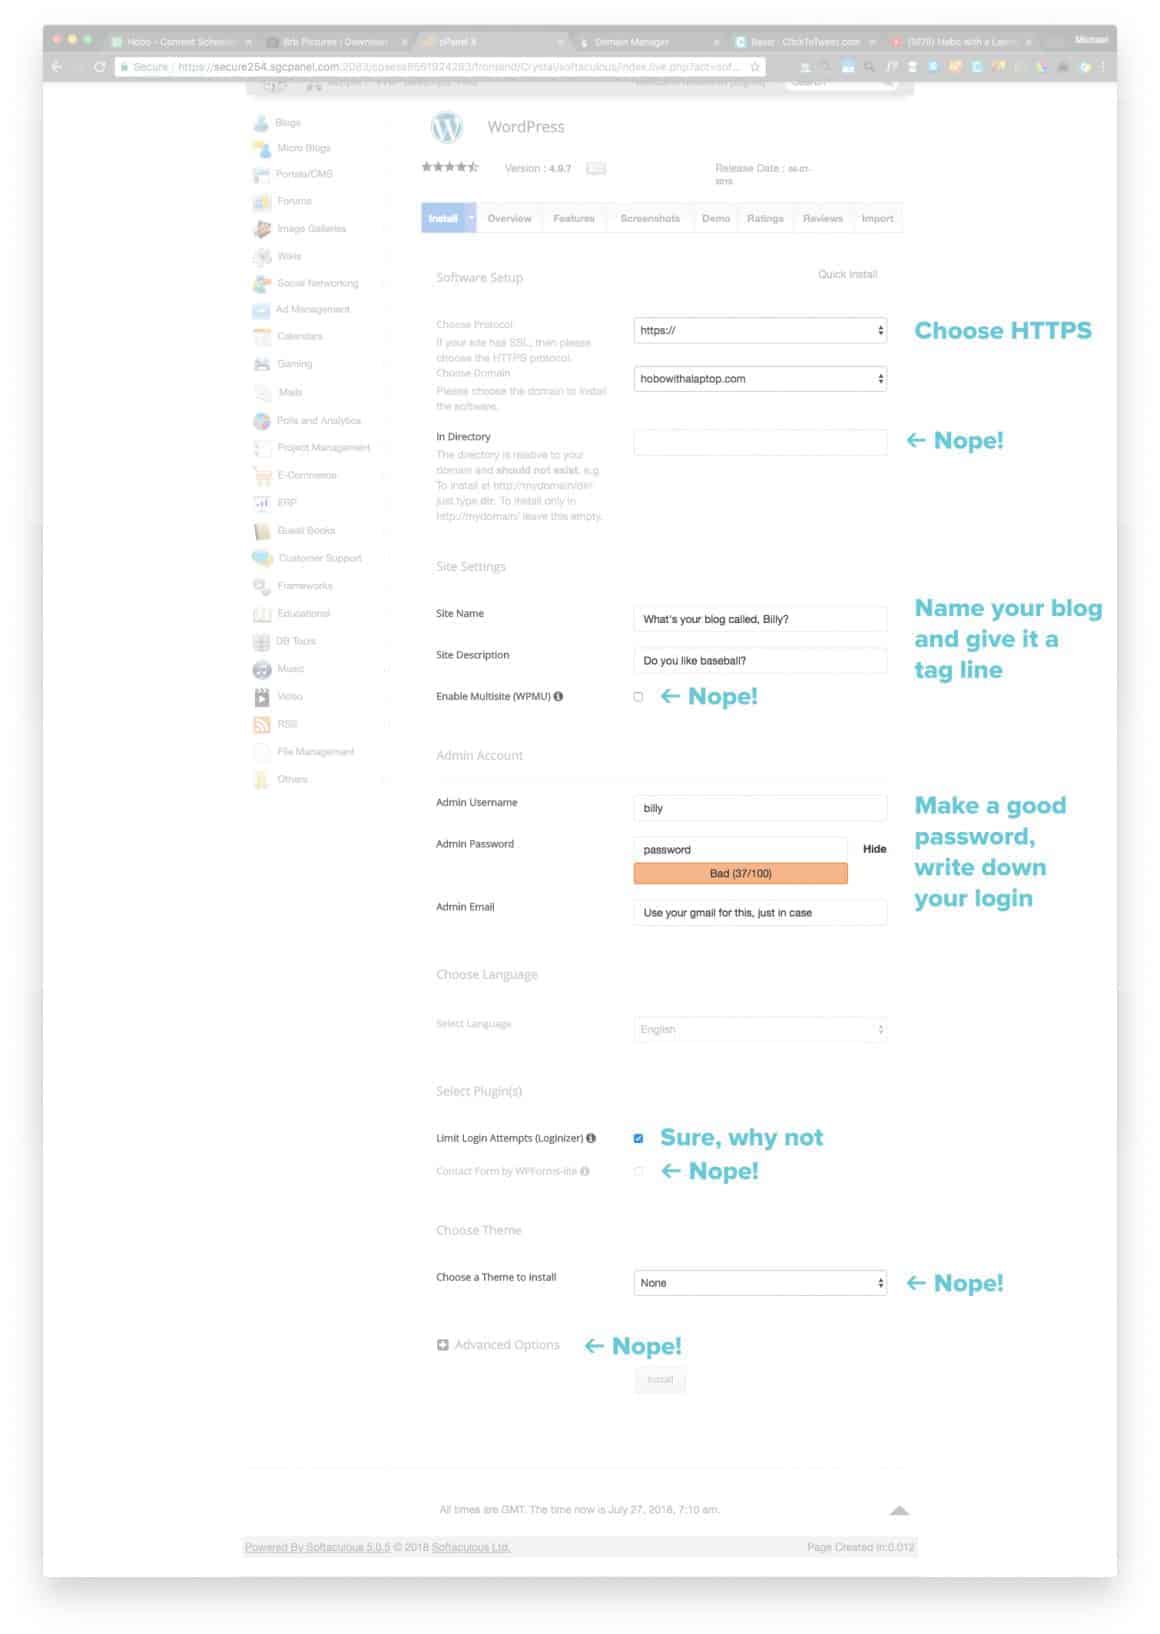
Did you get an error that said “A trusted SSL Certificate was not found” when you tried to enable HTTPS? If so, then choose HTTP for now.

I’ll explain how to enable SSL for free on SiteGround with Let’s Encrypt when you get the ‘a trusted SSL certificate was not found’ error message in the next section.
Before you can get started blogging, you’ve got to sit out the WordPress installation for a couple minutes, tops. Keep the browser tab open while Softaculous sets up your blog site for the first time.
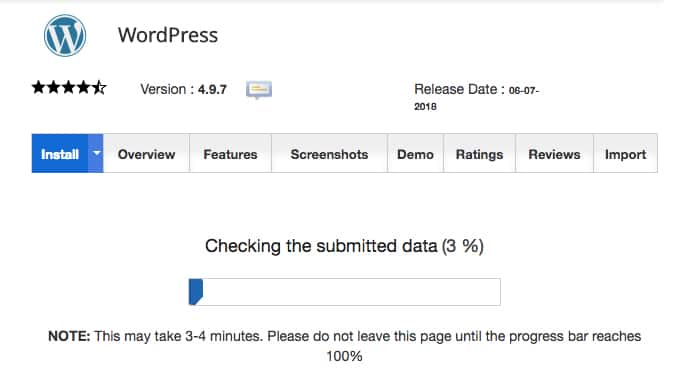
When the WordPress installation process completes, Softaculous will spit out two links. One for your home page, and another for your administrator login.
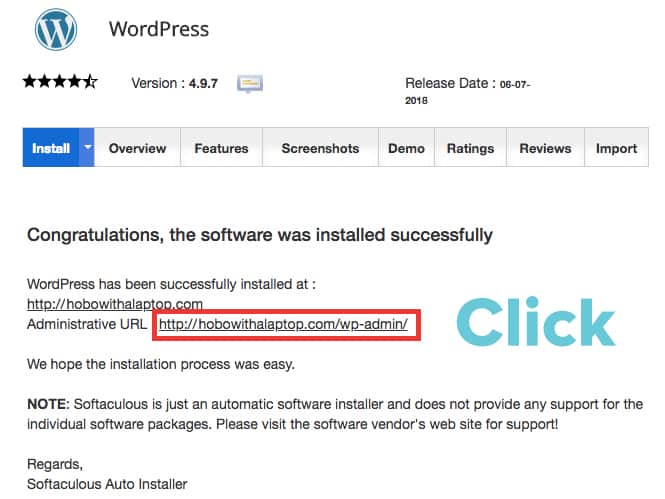
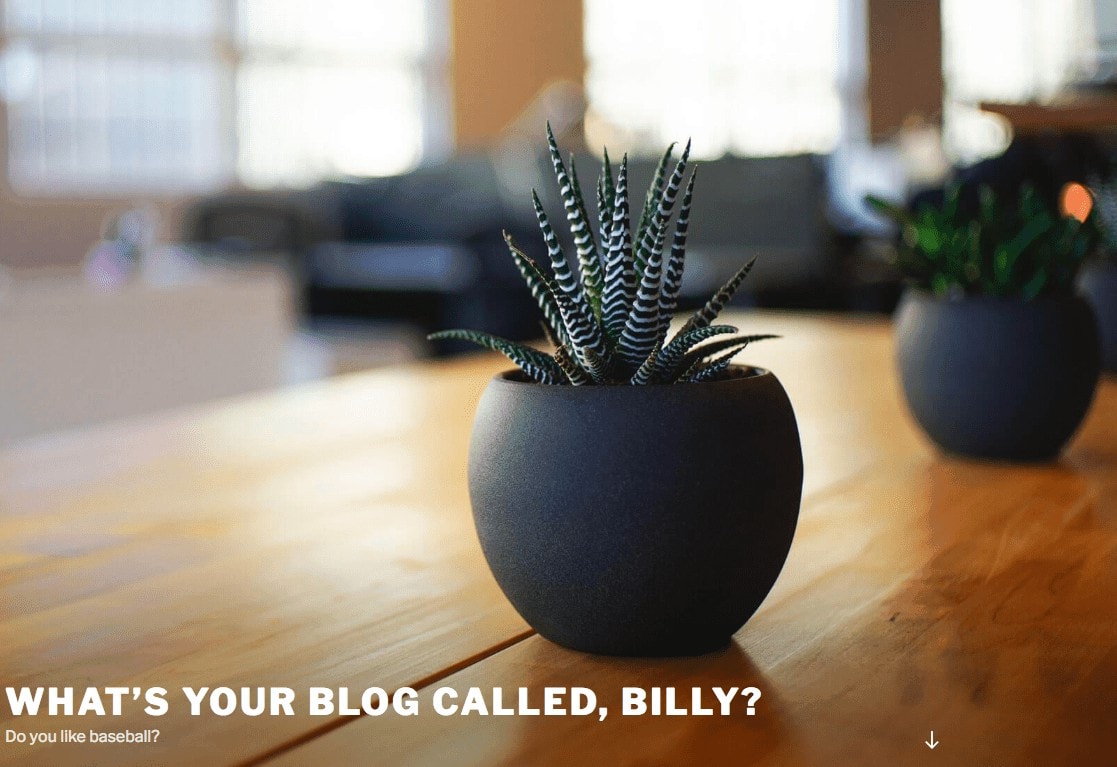
If you click on the link to your home page, you’ll see it’s already live and “wearing” the default WordPress theme. Born with clothes on. Ain’t that special.
If you click on the administrator login link, SiteGround may even magically log you in. It won’t do that next time, so save that login URL.
The default login URL for your WordPress blog is “yourwebsitename.com/wp-login.php”
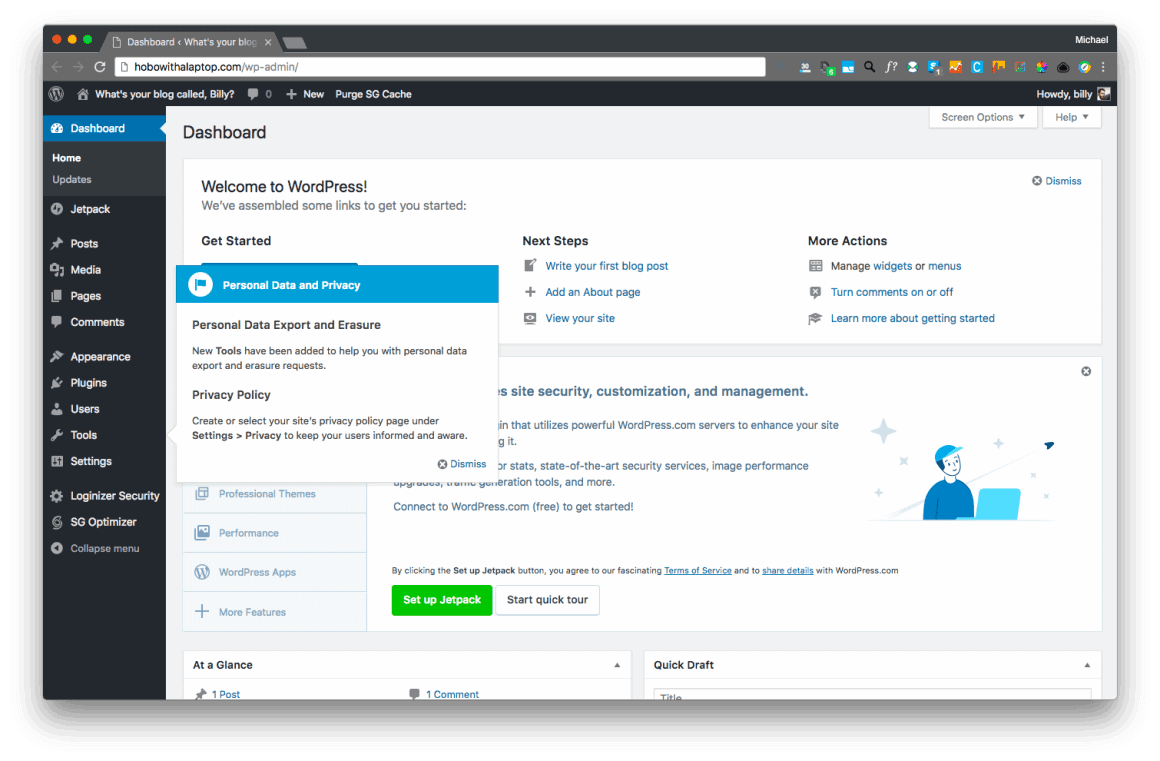
This is what you see when you login to your website for the first time.
Now let’s help those folks who couldn’t get their HTTPS working in the next section. I’ll walk you through how to activate your “Let’s Encrypt” SSL on SiteGround, step-by-step.
After that, we’ll help you setup your vanity email address, and then install your premium WordPress theme.

How to Install Your SSL Certificate for HTTPS
Now that you’ve figured out how to start a blog with WordPress, we’ve got a little housekeeping to do before you start blogging.
In this section I’ll show you how to set up your blog site with an SSL certificate so your website loads in “HTTPS”. Without it, browsers will scare your visitors away with a “this website is not secure” warning.
1
To begin, head back to SiteGround, log-in, click My Accounts, and then click on Go to CPanel like you did before. Once you’re there, look for “Let’s Encrypt”. That’s the SSL certificate provider.
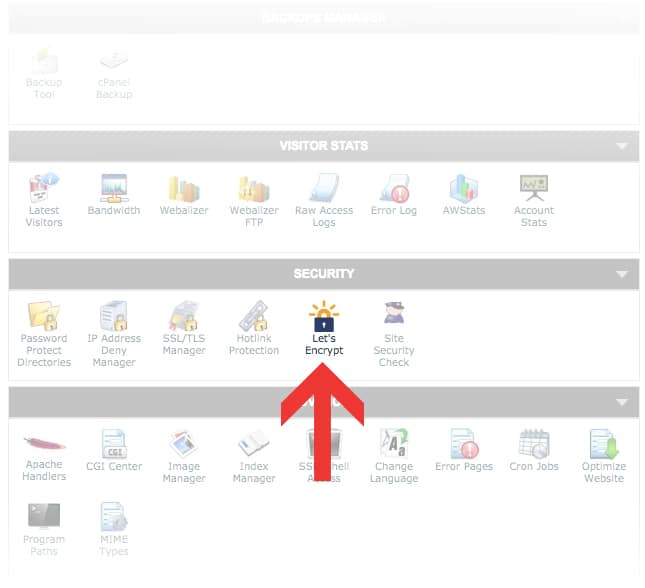
2
Near the bottom of the Let’s Encrypt settings page you’ll see a dropdown menu. Choose your website from the list (it’s probably the only one in there) and then make sure “Let’s Encrypt SSL” is selected. After that, hit “Install”.

After some buzzing and whirring, your website should have an SSL certificate installed and working properly. To be on the safe side, let’s check it out and make sure WordPress settings reflect your new HTTPS address.
3
Now let’s log into WordPress and go to Settings > General and make sure your new website address has HTTPS instead of HTTP.
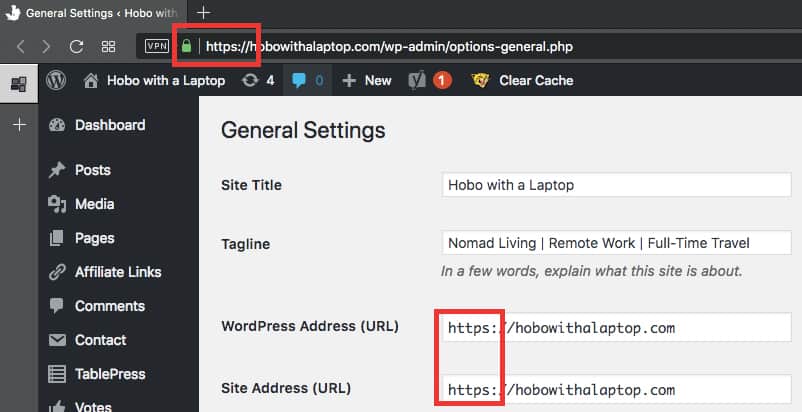
When you get there, it will probably already be setup with SSL for you like the example above. If not, change the two URL fields on the General Settings page to HTTPS by adding the “s” to “HTTP”.
Then click “Save Changes”.
After hitting save you may be be booted out of your website and you’ll have to re-login. The good news is, you’re done setting up your WordPress blog with a Let’s Encrypt SSL certificate.
Your blog is now as secure as a bank website. Now let’s setup your vanity email address, shall we?

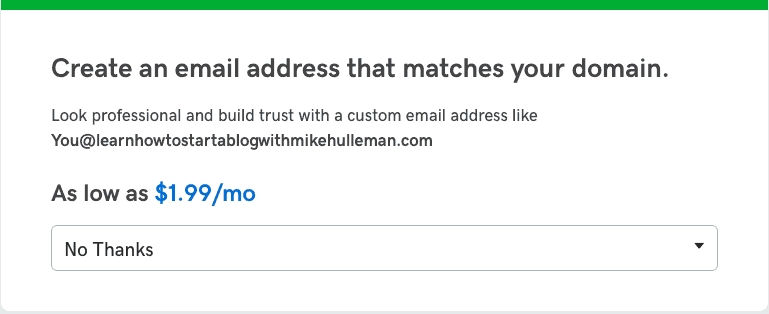
How to Setup Your Blog Vanity Email Address and Your “Catch All”
In this one we’re going to do two things; setup your blog vanity address, and setup a “catch all” so any emails going to your domain will all fall into your vanity email inbox.
A catch all email address is a wonderful thing.
If all email goes to the same inbox, whether there’s an actual email address set up for it or not, that means you can do some cool stuff like make up disposable email addresses on the spot.
And find out if someone sells your email address when you sign up for a newsletter. That’s a big no-no (and something we’ll never do if you sign up to our newsletter).
If you give Jill a disposable email address like [email protected] and then a guy named Bill emails you with that same email –you know that Jill gave it up.
If you get spammed to a disposable email address, you can just “turn off” that address with your spam filter or set up a “bounce” that really annoys spammers.
So, for example –if I sign up for a newsletter about pineapples, I’ll sign up as “pineapples (at) hobowithalaptop.com”. When they send their newsletter, it will be “caught” and automagically sent to my main vanity email.
If for any reason I can’t unsubscribe from that newsletter in the future, I just auto-junk all future emails TO “pineapples (at) hobowithalaptop.com” via Gmail email filters.
If you want to get more creative, you can assign different emails to different clients or newsletters, just by putting their business name before the “@”.
Catch all disposable emails give you more control. When I used Tinder, it was tinder (at) whateveremailaddress.com. Disposable emails are a great way to track what online services do with your data.
If you don’t use them the way I just suggested, that’s a-okay –I still recommend you set up a catch all so you never miss an email if someone types your email address wrong.
After all, it could be a sponsor.
Anyway, let’s start with that vanity email address.

How to Setup Your Vanity Email
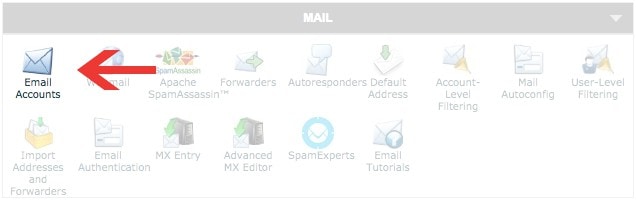
1
To begin, head back to SiteGround, log-in, click My Accounts, and then click on Go to CPanel like you did before. Once you’re there, look for “Email Accounts”.
2
On the Email Settings page, type in what you’d like your main email to be before the “@yourwebsite.com”. Then choose a secure password, and write it down somewhere to save it for later.
I also suggest making your inbox size huge, in the example below it’s just a little below 3GB.

3
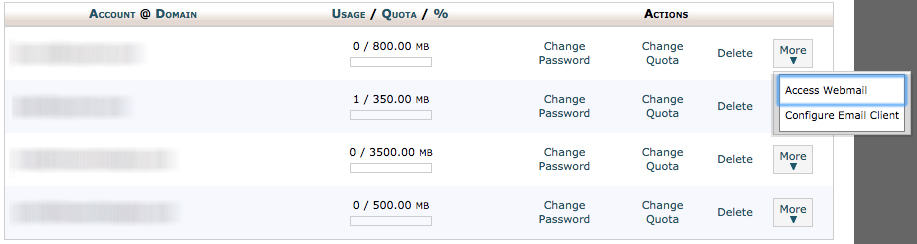
After you save your changes, your vanity email address will appear on the main email settings page. Select the dropdown to access the email settings. Those settings will help you configure your email client (or Gmail).
SiteGround provides some excellent email setup tutorials within CPanel, and if you need help with Gmail check out this article.

How to Setup Your “Catch All” Default Address
1
To begin, head back to SiteGround, log-in, click My Accounts, and then click on Go to CPanel like you did before. Once you’re there, look for “Email Accounts”.
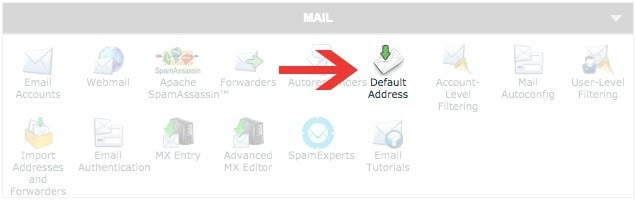
2
On the settings page for your blog’s Default Address, select the “Forward to Email Address” option, enter your vanity email, and save your changes. Now all email headed for your blog will end up in one place.

And that’s it! You’re done configuring your email on your WordPress hosting server. As mentioned before, all that you need to do now is configure whatever email client you use.
Now let’s move on to setting up your premium WordPress theme.

How to Setup Your Premium WordPress Theme
We’re one step closer to the end of this How to Start a Blog with WordPress step-by-step how-to guide. In this section I will show you how to upload and configure your premium WordPress theme at a high level, and then we’ll close with setting up Google Analytics and a lesson about WordPress SEO.
As mentioned earlier in this guide, I suggest you read our Premium WordPress Theme Buyer’s Guide. It will help you better define your blogging requirements and help you choose a theme that suits your needs most.
And because no two premium WordPress themes are alike, I also suggest you review the documentation that will come with your WordPress theme.
1
If you purchased your premium WordPress theme from Envato, head over to your downloads page and hover over the download button. When the dropdown menu appears, choose “Installable WordPress file only”.
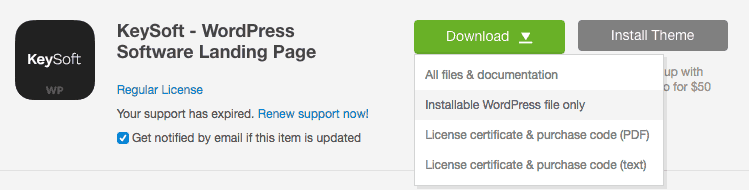
If you download “All Files and Documentation”, that zip file will contain your Installable WordPress theme file and your theme’s documentation.
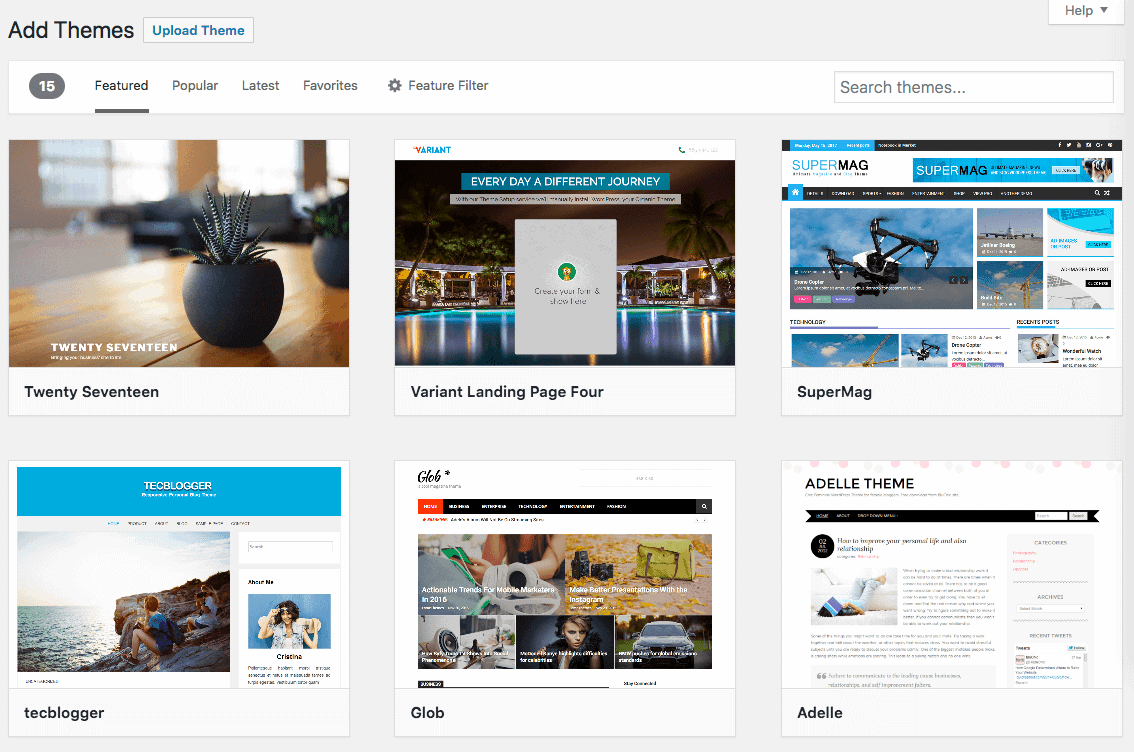
2
Login to your WordPress blog and go to Appearance > Themes and click “Add New”. From there you will be directed to a page that has a number of free WordPress themes.
As previously mentioned, avoid free themes –they often aren’t supported, updated enough, and can make your site vulnerable to hackers because they’re out of date often.
Choose “Upload Theme” at the top of the page instead.
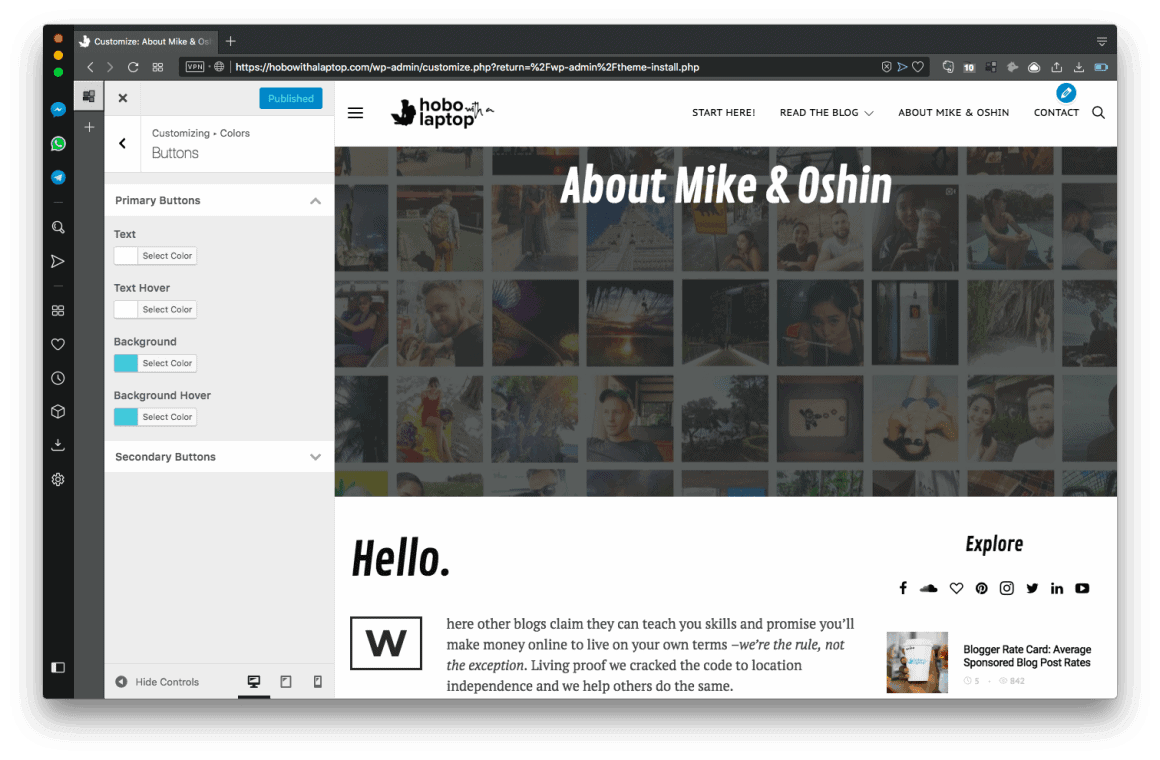
3
Once you’ve uploaded your WordPress theme, choose “Preview”. This will take you to the Theme Customization page. Most theme options will be here –here’s what ours looks like:
From here on in, we leave the ball in your court in terms of WordPress theme customization.
Now it’s time to experiment –sometimes theme documentation makes more sense after you’ve spent an evening and a few glasses of wine tinkering with your website.
In the next and final section of this How to Start a Blog with WordPress tutorial we’re going to take a long, hard look at blog SEO.

Influential Bloggers Make This SEO Mistake
In this post I mention a few of my former Chiang Mai neighbours, all successful travel bloggers, who I reverse engineered in an attempt to mirror their success.
Researching what is working (and not working) for others is an important step when you’re learning how to start a blog.
I analyzed all the things they were doing right, and that’s what we went by when we rebooted Hobo with a Laptop in May 2017.
But many of them were leaving money on the table with a costly SEO mistake. They were indexing duplicate content into search engines.

Indexing Duplicate Content is a Default Setting in WordPress
If your intention for learning how to start a blog with WordPress is to make money blogging, you need to know how to prove your worth to sponsors with effective, clean Google Analytics data.
Google Analytics will deliver that proof, but first you need to learn how to set it up properly.
By default WordPress asks Google to index photo attachment pages, archive index pages, category pages, tag pages, and so on.
If you have Google indexing multiple pages and files that have similar titles, keywords, and content, some of those pages will bubble up to Google Search results pages.
But do you want them all on Google? No way.
Ideally, you only want posts and pages published onto Google Search results pages, right from the beginning when you’re learning how to start a blog with WordPress.
You do not want photo attachment pages, archive index pages, category pages, or tag pages to appear in search results because they compete in search results with your front-row content.
You know, the stuff you worked hard to write and produce. Articles.

Once I got my bearings and started to make money blogging, I circled back and let them know they were indexing duplicate content.
Some real heavyweight bloggers were making this mistake, too.
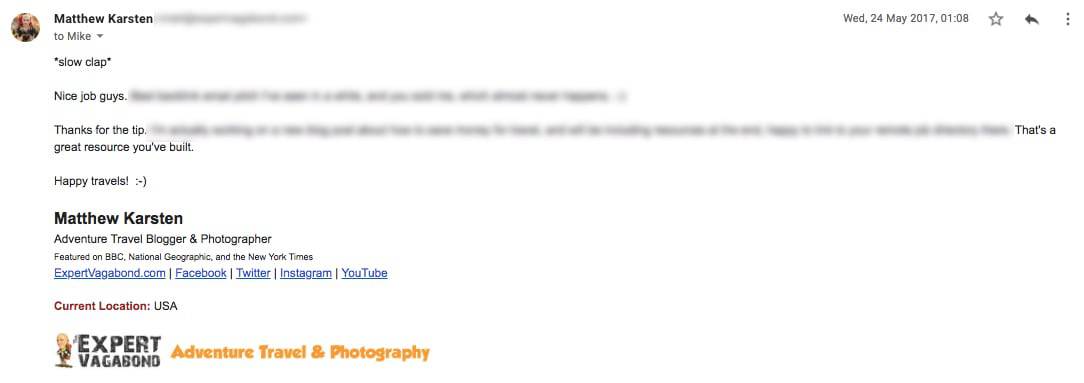
They were successful in spite of it, sure. But it probably slowed their success. Something you’re here to avoid –but also something that makes their success even more remarkable.
So I started emailing everyone with instructions on how to fix it.

Mark Manson, Expert Vagabond, Getting Stamped, Keep Calm and Travel, Goats on the Road, Two Monkeys, Love and Road, Nomad is Beautiful, Breathing Travel, Hand Luggage Only –all experts, some of them friends I met along the way. And they all had duplicate content running into Google.
Learning how to start a blog with WordPress is challenging enough in the first year. Cannibalizing your search results just makes it harder. It’s like ice skating up hill.


The technical aspects of starting a blog with WordPress can fly over the heads of anyone, even seasoned professionals.
With that in mind, let’s talk about how to properly setup Google Analytics and your blog site to make sure you’re not indexing duplicate content on search engines when you start your blog with WordPress.

How to Setup Google Analytics
In this section I’ll help you quickly setup Google Analytics, but then I will go a step further and ensure you’re only indexing what matters.
We’ll be working with two SEO-related WordPress plugins; Monster Insights (a plugin formerly owned and supported by Yoast), and Yoast SEO.
Create a Google Analytics Account
Everyone’s got a Gmail. I’m sure you do, too. Whether you do or not, create a Google Analytics account by following these steps before you begin this tutorial. I’m linking outward because these things change and I want to ensure you have the most up to date information.
Once you’ve created a Google Analytics account, you’re ready to follow along below.
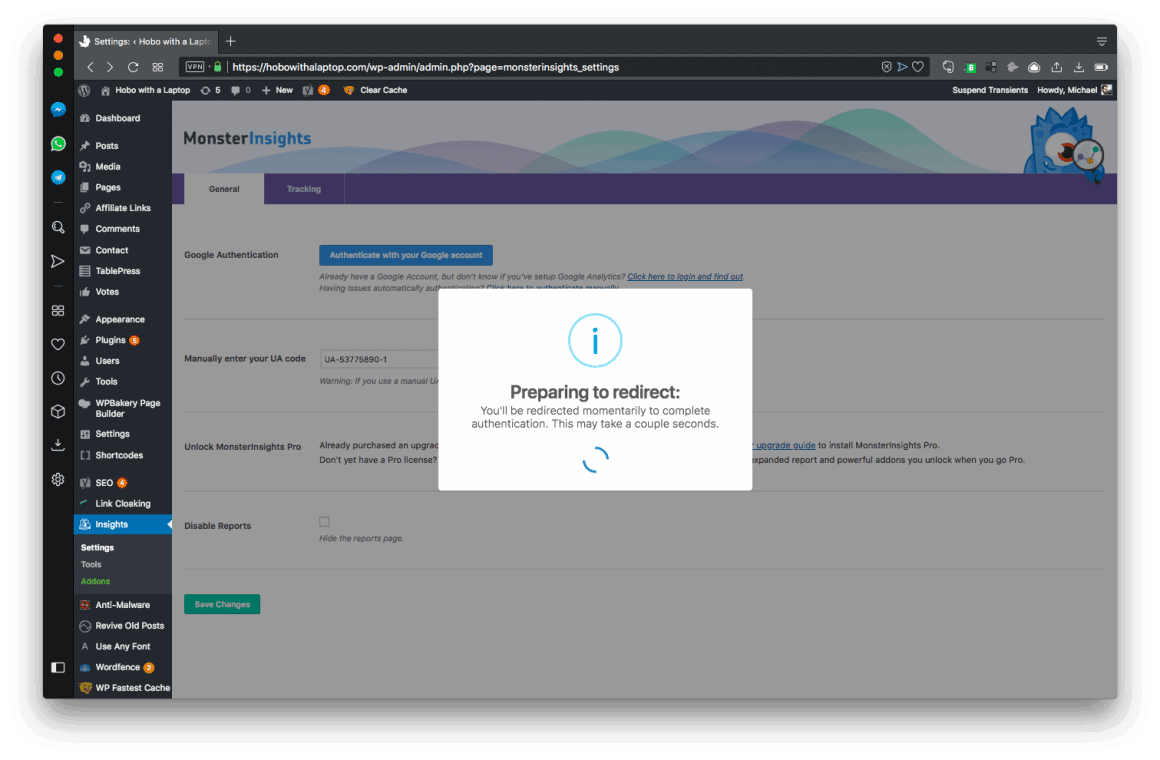
Install Monster Insights
1
Download Monster Insights from the plugins directory and add it to your website. Go to Plugins > Add New, and search for Monster Insights. Install, and activate the plugin. From there, you’ll need to visit Insights > Settings.
2
From there, click on the new option it creates on your WordPress Dashboard; Insights > Settings, link your Google Analytics account to your website by clicking “Authenticate with your Google Account”. Follow those steps.
Once you’re done linking your Analytics from Google to your WordPress site, it’s time to download and install the Yoast SEO plugin.
Install Yoast SEO
There’s an easy way to tell if you have duplicate content being indexed into Google when you first start a blog with WordPress.
Go to https://yourwebsitename.com/sitemap.xml
If you’ve got no sitemap.xml, that’s bad news bears. Installing Yoast SEO will create one for you.
If you do have a sitemap already and there’s more than “post-sitemap.xml” and “page-sitemap.xml” on there, that’s even worse.
Simply put, you want your sitemap to look like this:

Here’s an example of a sitemap that has default WordPress settings:
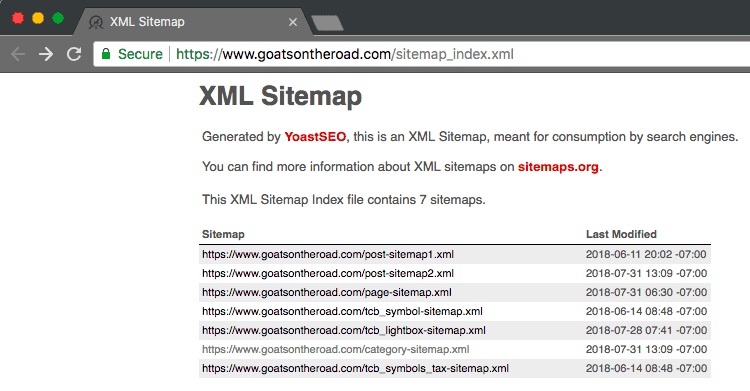
That means their sitemap is telling Google to index “categories” like this one.
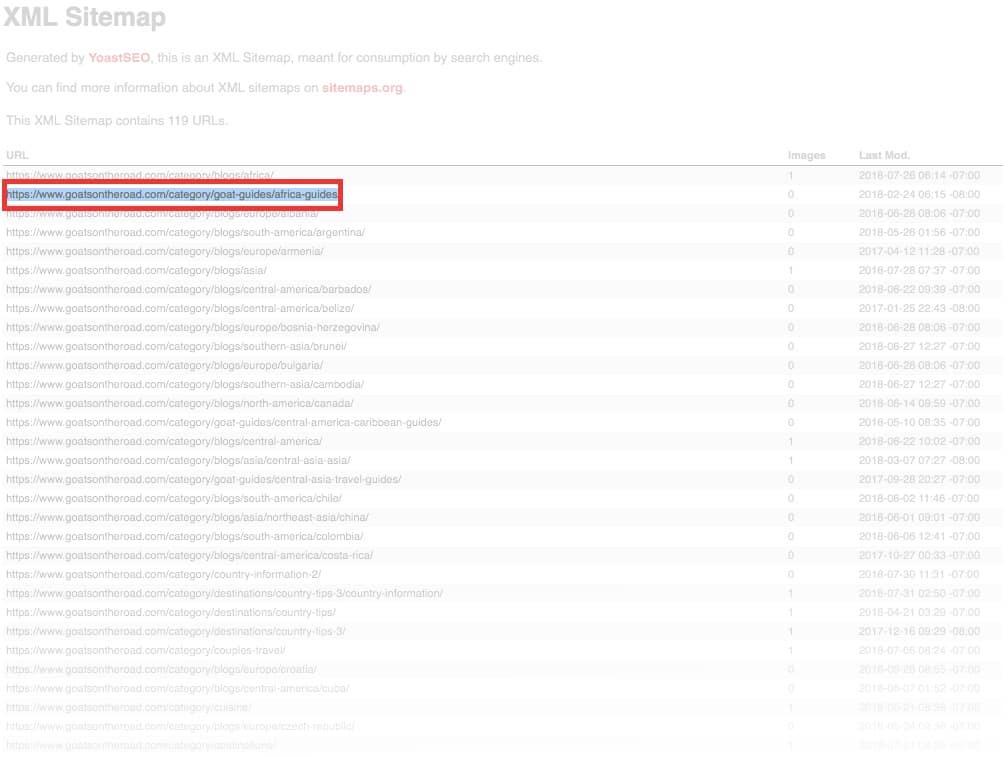
If you take a look at that page, you’ll see a description of each post in that category:
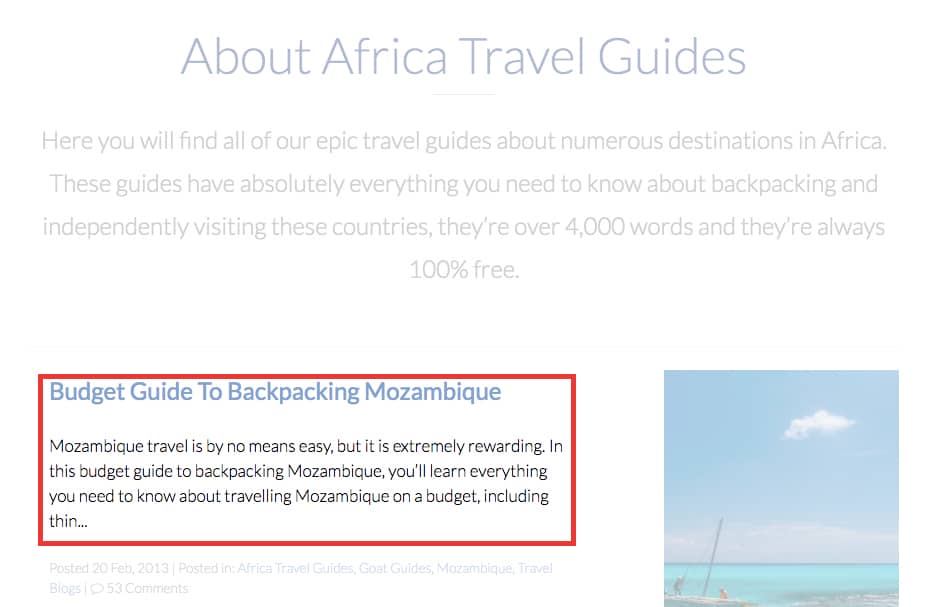
With same or similar words are also found on the post itself:
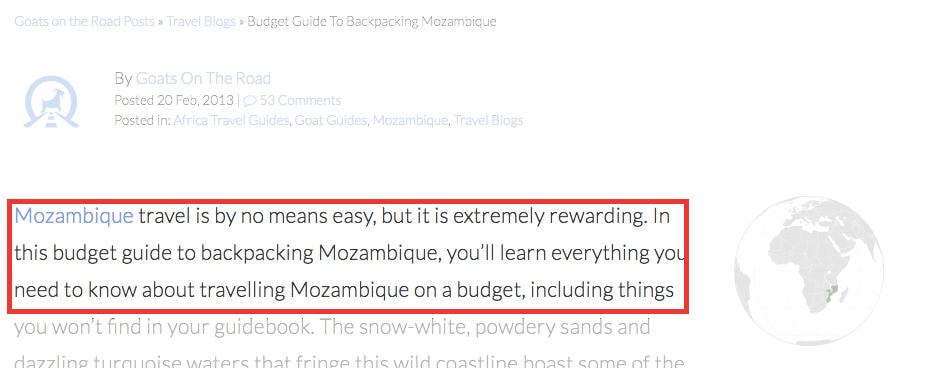
That means they’ve got duplicate content currently being indexed into Google, needlessly competing with one another, when they both have similar or identical keywords.
If these posts are in multiple categories or tags, then there could be dozens of pages hurting the rank of these posts. Category or tag index pages like this take up valuable Google real estate and shouldn’t be there.
Now let’s show you how to avoid the same default WordPress setting.
1
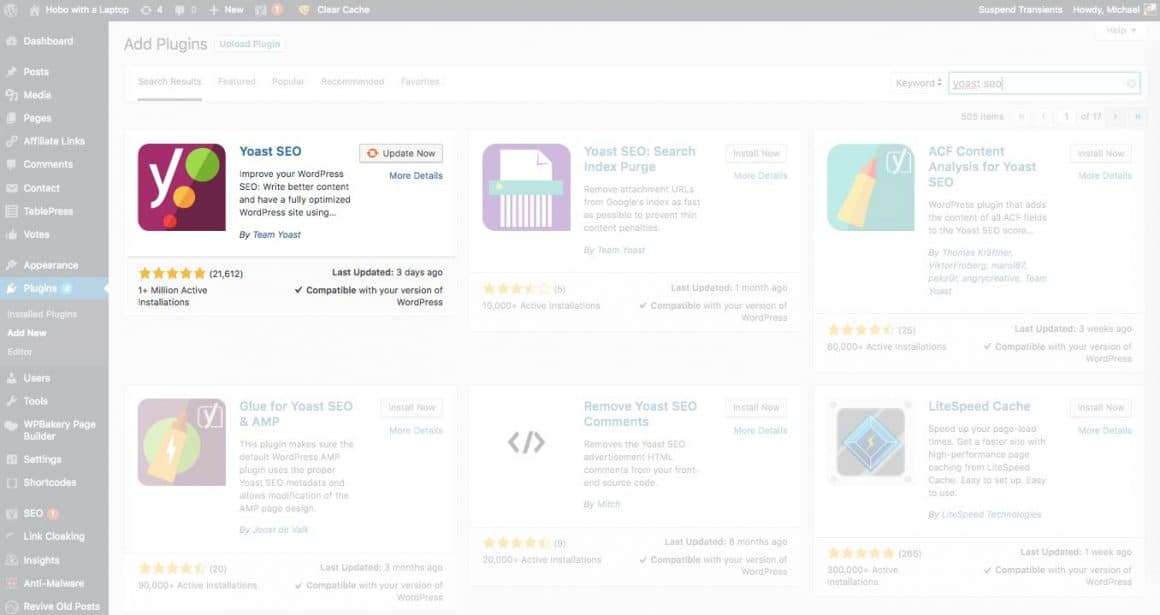
Download Yoast SEO free from the plugins directory and add it to your website. Go to Plugins > Add New, and search for Yoast SEO. We use their premium plugin version now, but their free offering served us very well for 14 months before we decided to get serious and invest in our success.
2
Install and activate the plugin, and then head over to it’s settings via SEO > Search Appearance. Once there, hide Content Types that you don’t want indexed into search results pages on Google or other search engines.

In our case we use plugins that created custom content types like votes and affiliate links. We definitely don’t want those indexed.

If you don’t have content types that you do want indexed, like “products”, “reviews”, “locations” etc. then only allow Posts and Pages to be indexed.
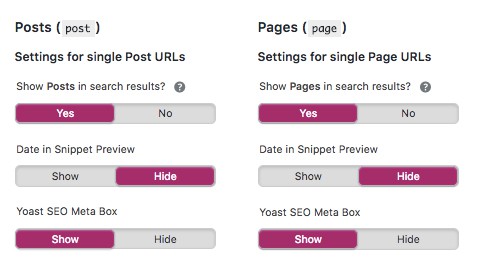
If you have a content type like “products”, “reviews”, or “locations” make sure you write original text for each one and that they are indexed; never copy and paste text from sites like Amazon and put it on your own WordPress blog. All text on your website needs to be original or you’ll get slapped by Google.
Also worth mention; I turned off “date snippet” because most of our content is timeless and “evergreen”. A date too far back in the past may be unattractive to someone when they see your page in search results.
On posts that are time sensitive, I’ll usually mention the date it was written within the post, instead.
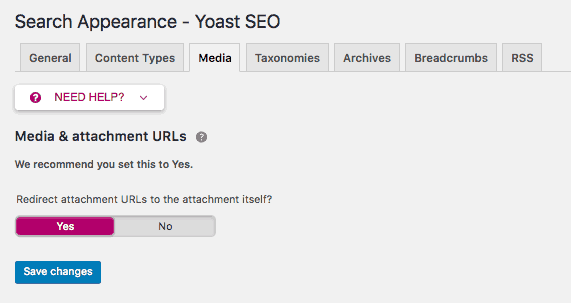
3
Now hop over to the Media tab and select Yes for “Redirect attachment URLs to the attachment itself?“. By default WordPress dynamically creates a page for every image you upload.
4
After Media, it’s time to turn off all Taxonomies. Taxonomies are similar to archive pages, in that they display an archive of all posts that are part of a “tag” or a “category”. You only want posts or pages themselves indexed, not their related taxonomies or archives.
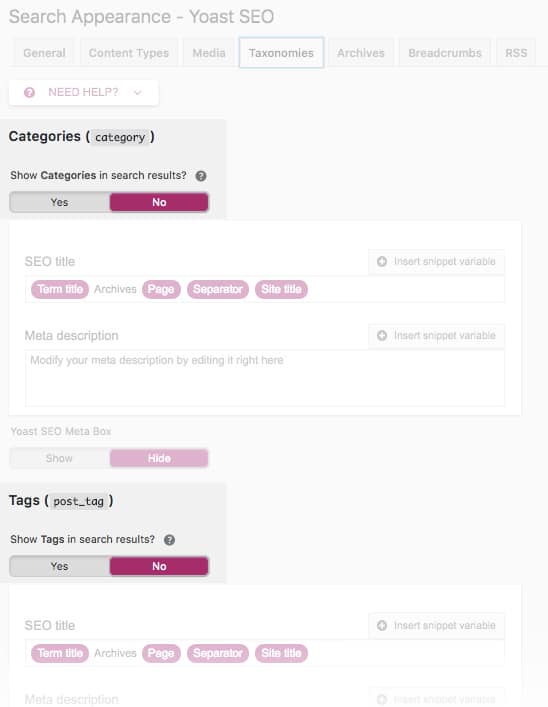
At the bottom of the taxonomies page, you’ll see the option to “remove the categories prefix“. Put simply, it’s just the /category/ part of your blog post URL. It’s good SEO practice to remove it, although I’ve left ours on.

5
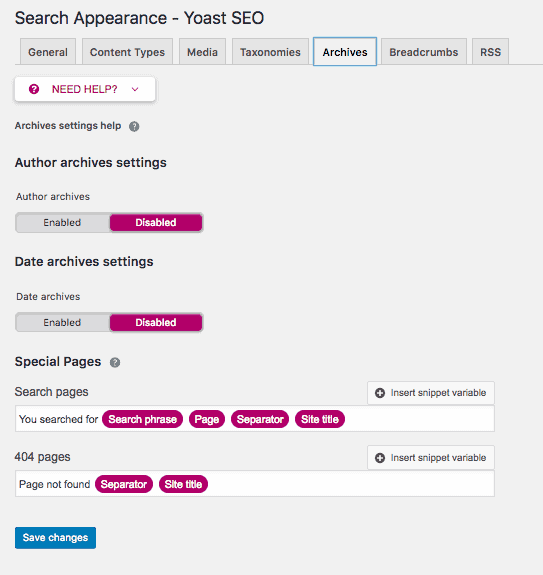
And finally, head over to “Archives” and turn off Author Archives and Date Archives. This is the last setting we recommend changing right now.
That concludes this part of this How to Start a Blog with WordPress SEO tutorial. If you’d like to learn more about how to configure Yoast SEO, take a look at their documentation here.
Your next step is to create a home page for your WordPress blog, which you can learn how to do here.
This is where the adventure begins, and we’d like to help you in as many ways as possible. Take a look around Hobo with a Laptop and maybe you’ll find answers to questions that arise as you continue along your blogger’s journey.

Smaller Images, Faster Loading Times, Higher Search Rank
Ideally, your WordPress blog will load in 2 seconds or less.
We use ShortPixel to shrink our images and it’s improved our search rankings dramatically. Page loading time is a massive priority –not only for Google Search optimization, but also for visitors who tend to click away when a page takes too long to load.
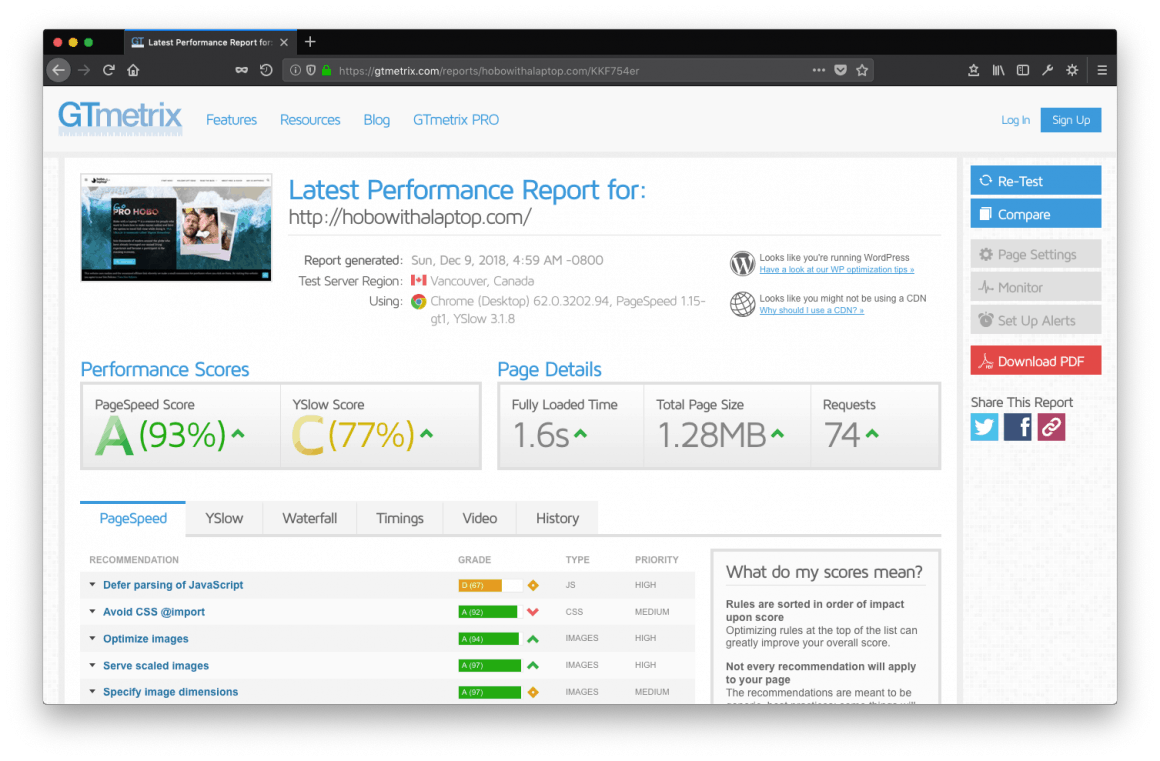
Stop putting off faster website loading times, it’s hurting your wallet. Check out ShortPixel.
![]()
Should I Get Help to Make Money Blogging Faster?
How do you ask for help if you don’t know what questions to ask? Spending a few months figuring out how to make money blogging on your own will inspire great questions.
“Gurus” will promise the moon, but it’s because they attract noobs. Protect yourself.
Once you understand enough about how to start a blog with WordPress and make your first dollar, it’s easier to hire help so you know the value of what you’re asking for.
Understanding how WordPress works and the time required to facilitate tasks will ensure that you’re not overcharged (or asking for too much) when you hire the help of a professional WordPress designer or developer, too.
We do coaching, and design, social media, and more to help new bloggers make money blogging –but only serious bloggers need apply (that’s the rub).
What Did You Think of This “Blogging for Beginners” Guide?
We really hope you found this guide valuable, and we always appreciate feedback in the comments.
Learning how to start a blog with WordPress isn’t always easy –the theme and/or plugins you choose will change the way you use WordPress. They create gaps in understanding between what you find on Google, and what you’re personally dealing with.
Your developer is the only person on earth that knows your theme inside and out. It’s important to get familiar with your theme’s documentation because you’ll probably be using that theme for the next 2 to 4 years if you chose it for the right reasons. It’s a marriage.
Related: Follow These 10 Steps to Write Better Blog Posts, Get More Traffic, and Make Money Blogging
That concludes our How to Start a Blog with WordPress guide. If you have anything to add, we’d love to hear from you in the comments below. And in my best Jerry Seinfeld voice –It took three days –three days to write! Please share, although this isn’t a shakedown. You do you!
Big love from Palawan,
Mike (and Oshin!)


Check Out Our Free Blogging Course!
If you found this post helpful, check out the rest of our free blogging course.
You’ll learn how to start a blog from scratch, make passive income –and much, much more!
Learn Blogging