


There’s no information overload with this free Amazon FBA course. We made sure it’s distilled and digestible, and cut the fat to help you get started selling on Amazon quickly.
Sure, there’s lots you’ll learn along the way but this is all you need to know to get started right away.

Amazon FBA Course: Getting Started
I’m pretty confident you’ve bought products on Amazon before, and you’re here because you want in on the action.
You may be surprised to learn that many of the products listed on the site are being sold by regular people just like you.
This is what got me interested in selling on Amazon a few years ago when I was looking for a potential side business to pursue. I liked the idea of selling physical products, and the more I looked into it the more I realized it was a profitable business model that had the potential to be scaled into more than just a part-time venture.
Within weeks of first having the idea to sell on Amazon, I had my first product listed on the site and was making money with Amazon FBA.
How Does Amazon FBA Work?
Learning how to start selling on Amazon FBA might seem like a lot to chew on at first, but it’s really not that difficult once you know the steps involved. All you need is a little time, a small amount of capital that you’re willing to invest, and the right tools.
I’ve detailed the steps I took to start selling on Amazon in this short Amazon FBA course so you can see the process for yourself and decide if you want to give it a try.
Step 1: Open an Amazon Sellers Account
To start, you’re going to need to open an Amazon Seller Account. The signup process is pretty straightforward:
- Go to sell.amazon.com.
- Click “Sign Up.”
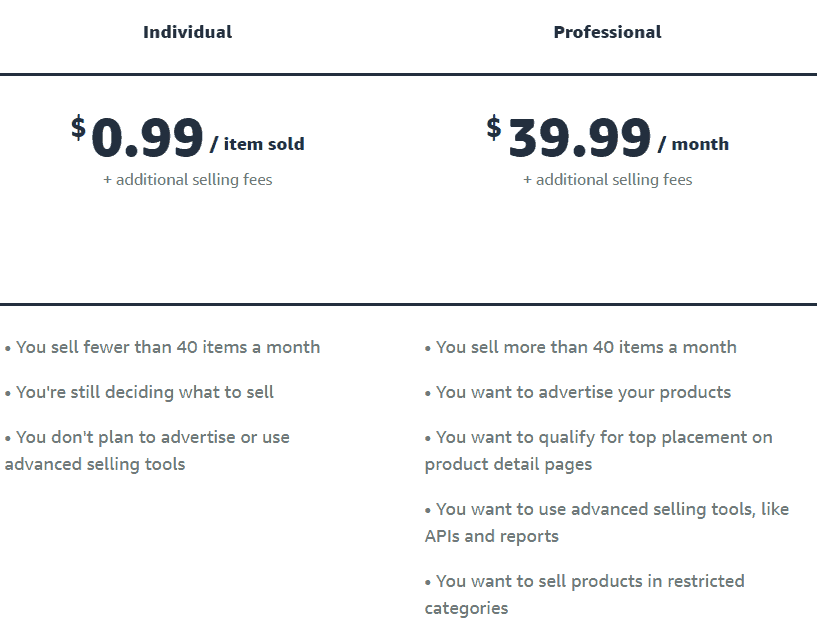
- Choose whether you want to be an Individual Seller (charged $0.99 per sale) or a Professional Seller (charged $39.99 per month). If you plan to sell more than 40 products a month I recommend choosing to be a Professional Seller.
- Fill out the required information.
Step 2: Decide How You’re Going to Fulfill Your Orders
Before you go any further you should decide what kind of business model you’re going to use for fulfilling your orders. Amazon gives you two options:
- Fulfilled by Merchant: You’ll store all your inventory yourself and ship products to customers when someone purchases them on the site.
- Fulfilled by Amazon: You’ll ship all of your inventory to Amazon and they’ll store it in one of their warehouses. When someone buys one of your items they pack and ship it for you.
For most sellers, I’d recommend the Fulfilled by Amazon (FBA) program –and that’s the general direction I’ll go for the remainder of this guide.
Selling on Amazon FBA is a great way to make money without getting your hands dirty handling physical products, and you can do it from anywhere.
No matter where you live, or where you are, it’s easy to manage a dropshipping business and selling on Amazon FBA is the easiest way to do it.
Step 3: Find the Best Products to Sell on Amazon FBA
Choosing the best products to sell on amazon FBA can seem a little overwhelming at first since there are literally millions of options available. But once you narrow down your criteria you should be able to find an item you’re excited to sell.
Here are a few tips to get you started:
- Look for products in the best price range: Products that are priced between $20 – $50 are generally best because they’re priced high enough to allow you to make a profit but not too high that people have to think too much before buying them.
- Choose something small and lightweight: Smaller items are cheaper to ship and store, which will cut down on your costs.
- Your product should have good sales volume: Before you decide to sell something you want to make sure there’s actually a demand for it.
- Your product should have low competition: Ideally, you want to choose a product that doesn’t have a lot of other people selling it. That way you won’t end up competing with too many sellers.
My sincerest advice to you today is to avoid those “best products to sell on amazon FBA” articles –they’re often overdone, and all the ideas on them have been read and adopted by hundreds of thousands of beginners.
They’re all long in the tooth, so do your own research. It’s your research that sets you apart and gives you an edge.
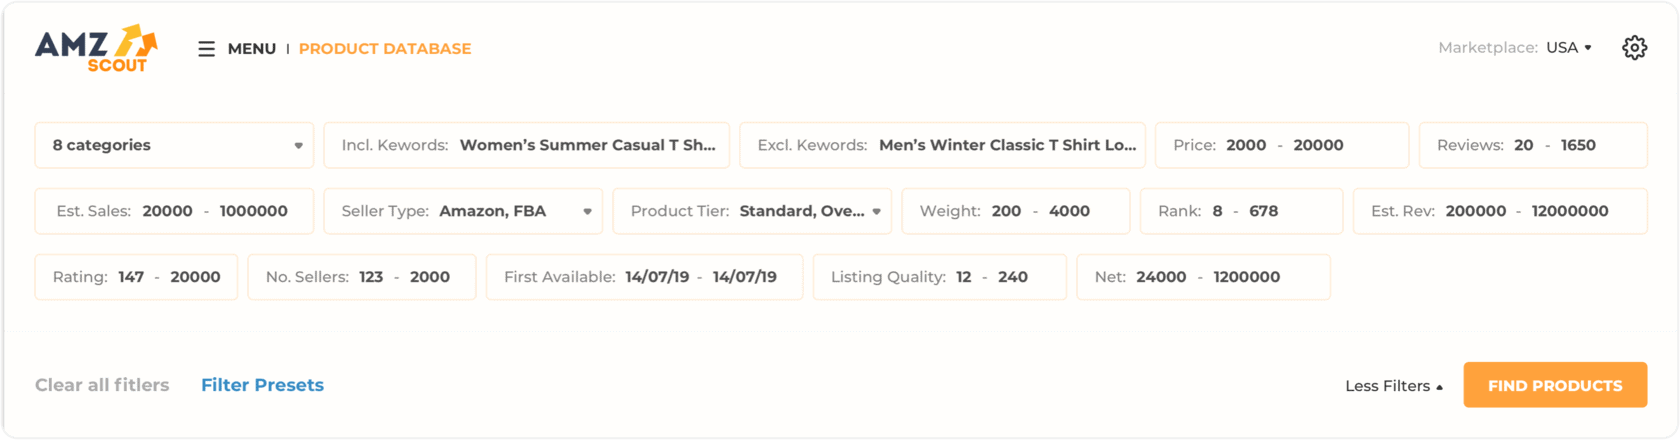
There are a number of tools available that can help you analyze products for the above criteria. Personally, I use AMZScout’s Web App and Pro Extension for my dropshipping business.
AMZScout has a number of filters that let you search for products based on things like monthly sales, reviews, category, size, weight, etc. I find it’s an easy way to find the best products to sell on amazon FBA that meet my search parameters.
Once I find some products I’m interested in, I use the Pro Extension to analyze them. This is a Google Chrome extension that allows you to analyze data on products and niches while you’re searching for them on Amazon.
When you’re viewing products on Amazon just open up the extension to get the information I need to make a decision.
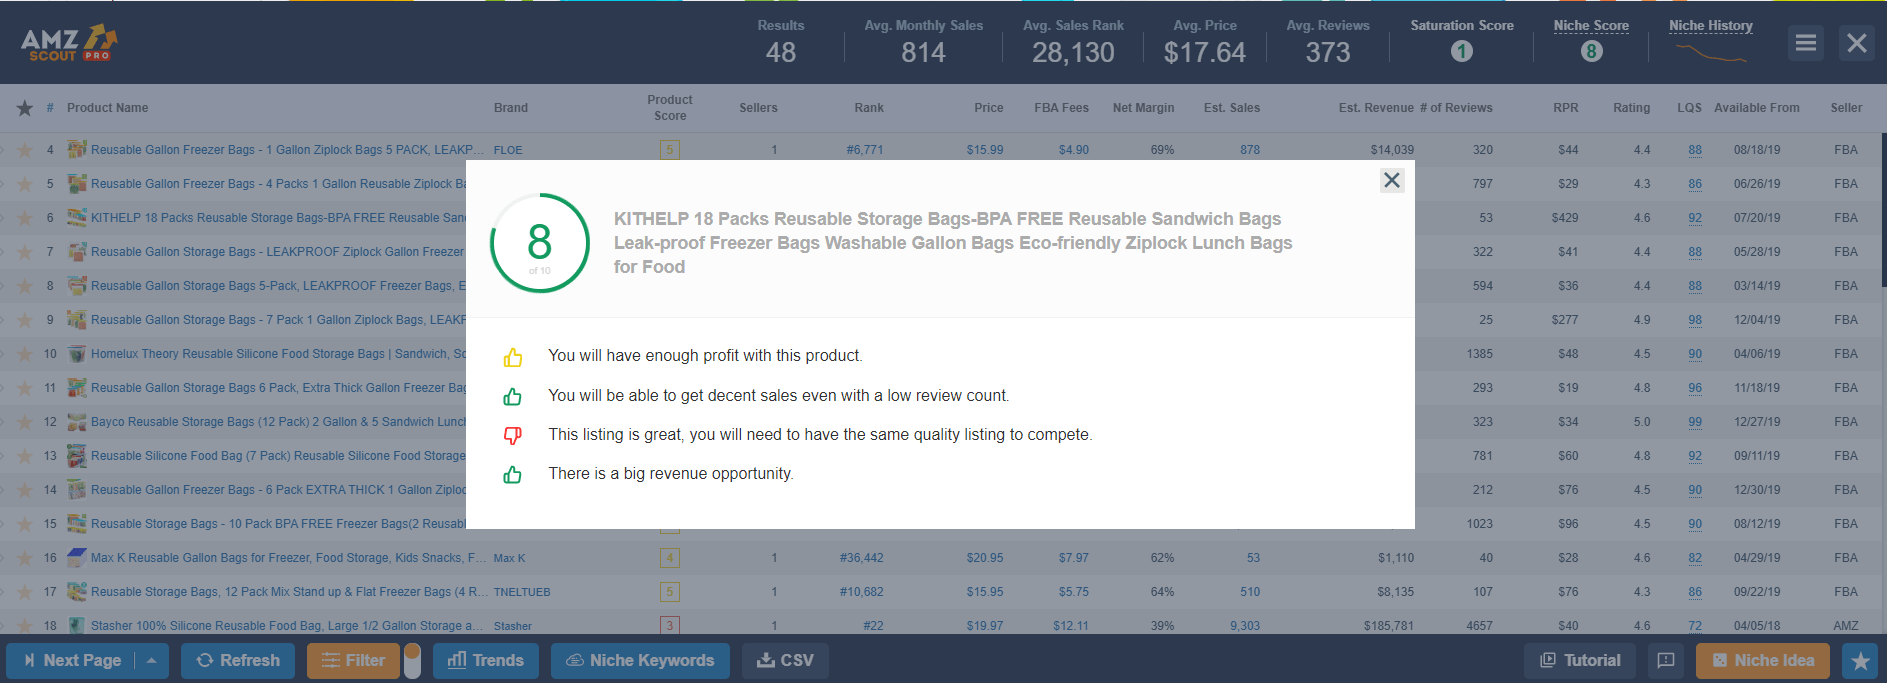
The product score is especially handy, as it will measure the level of demand and competition in order to determine how profitable a product will be to sell. If a product has a score over 7 that’s a good sign that you’ve found a winner.
Calculate Amazon FBA Fees
You’ll pay some extra fees for Amazon fulfillment service, but it’s way more convenient than storing, labelling, and shipping inventory yourself, or finding another partner to do it for you.
There’s less to worry about for you and your customers, because most people trust Amazon more than they trust Mom & Pop websites. That trust drives sales, big time.
The fees will pay for themselves, and they’ll dramatically reduce your marketing costs later.
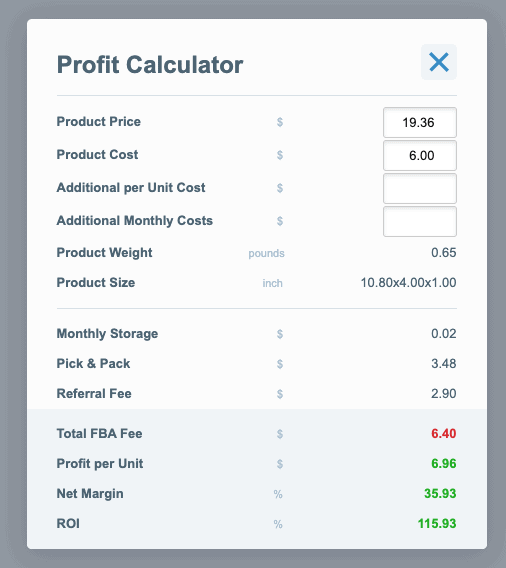
You can calculate Amazon FBA fees using AMZScout’s free Amazon Fee Calculator. This tool estimates all the fees involved in selling a particular product, which is really important to know before you make your final decision.
Calculate Your Profit
You can estimate your profits by using the Profit Calculator within the Pro Extension. Simply enter the cost of the product you’re interested in to see how much you could potentially make from each sale. And because it’s Amazon, you can be confident you’ll get volume once you work the kinks out with your listings.
Take your time when choosing a product. This is arguably the most important step. Do plenty of research and make sure you use the best Amazon FBA tools to ensure you make a sound decision.
Step 4: Source Your Products
When it comes to actually purchasing the products you’re going to sell on Amazon there are a few different strategies you can use.
Retail Arbitrage: This involves going to local retail stores and finding products that are on sale or clearance and are selling for cheaper than they are on Amazon.
Wholesalers: These suppliers sell products exclusively to businesses. You’ll have to buy in bulk but the cost per product will be a lot cheaper than you’ll find at retail stores.
Manufacturers: You can also go directly to the manufacturer. This is where you’ll generally get the best price.
If you have a larger budget I recommend just going straight to the manufacturer. You’ll have to buy in bulk just like you would from a wholesaler but your cost per item will be lower. Plus, when you’re dealing with a manufacturer you can have them customize the product for you and add additional features that will give you a leg up on the competition.

Find Products on Alibaba
In my opinion, Alibaba is the best place to source your products. The site gives you access to thousands of suppliers and manufacturers, making it really easy to find one that works for you.
With Alibaba it’s easy to search for the product you’re looking for and bring up a list of manufacturers that offer it. Message the companies and explain what you’re looking for.
If you’re interested in any customization, let them know what you have in mind and ask if your idea is possible.
Product customization is a great way to differentiate yourself from other brands, and you can design and market your unique brand from the ground up.
Your brand name would later become a unique SEO advantage, too –if people search for your brand alone, it’s a straight line to your website.
Make sure to have the manufacturer send you a sample before you begin the production of your custom product(s). You’ll want to make sure the quality is up to your standards, otherwise you’ll end up with a bunch of negative Amazon reviews.
Also, remember that most of the time the quotes you receive are absolutely negotiable. Make sure you have a budget beforehand and negotiate a price for your order that works with that.
I recommend starting with a smaller order to see if the product actually sells. Once you start getting some sales you can place a larger order.
Step 5: Create Your Amazon Listing
While you’re waiting for your products to arrive it’s a good time to create your Amazon listing. You can do this by going to Amazon Seller Central and then going to Inventory > Add a Product.
If you’re selling an existing product simply enter the UPC or ASIN number and the listing will automatically be created.
If you’re selling a new custom product you’ll have to select “Create a new product listing.” You’ll then have to enter your product’s information, such as size, weight, product name, the manufacturer (your company name), and the price you’ll be selling it at.
Make sure your listing is not live until you’re actually ready to sell your products. It’s a good idea to create your listing at this stage though, as it needs to be ready before you ship your products to Amazon FBA.
Step 6: Ship Your Products to Amazon
Assuming you opt for the FBA program you’ll need to ship your products to Amazon once they’re ready.
You can have your manufacturer ship the products directly to Amazon for you, but in my experience it’s best to have the products shipped to you in the beginning so you or a trusted friend can inspect them and ensure everything is in order before sending them to Amazon.
To ship your products to Amazon, go to Seller Central and select “send/replenish inventory.” Fill out all the required information, including the quantity, size, and weight of your products.
Once everything is in order you’ll be able to print off your specialized shipping labels and send your products on their way using the shipping company of your choice.
Step 7: Marketing
After you ship your items to Amazon’s warehouse and your listing goes live, it’s a good idea to do some marketing to give your sales a bit of a boost.
You’re going to want to do some keyword research to see which keywords you should be targeting for your product.
AMZScout’s WebApp has a great keyword tool that will help you find the right terms to use. Once you have your Amazon keywords, try to work them into your product listing as this will help you show up in more Amazon search results.
If you’ve got the budget I also recommend you purchase some Amazon PPC ads to increase the traffic to your listing. Use the keywords you found using the Web App to build your campaigns and promote your product.
Conclusion
So, that’s how Amazon FBA works! Those are the basic steps involved in starting your own Amazon business. It does take a little bit of time and effort to get things up and running, but once you do it’s a fairly easy online business to run and manage.
Once you have success selling one product on Amazon FBA, you can start adding more items and growing your business. I definitely encourage you to look into this further and do your own research to decide if this opportunity is right for you.
That wraps up this chapter in our free Amazon FBA course, stay tuned for more guides to follow.